I just completed the second Duelund-WRSE Project article and sent it to Editors Dave & David at Positive Feedback Online. I ended up at 42 pages of Word text and 69 photographs by the time I finished it. I have to say I'm pretty excited about the article, and I really hope you all enjoy reading it as much as I enjoyed writing it.
In time the full article will also appear here at Jeff's Place as well as Positive Feedback Online. Here's the introductory part of the article for your reading pleasure:
Duelund Coherent Audio from Denmark:
The Duelund-WRSE Project, Part 2: Duelund CAST Silver Capacitors and Duelund CAST Silver & Copper Autotransformers
An article by Jeff Day
The Duelund Coherent Audio / Tannoy Westminster Royal Special Edition Project article I wrote for Issue 70 of Positive Feedback Online was the most fun I’ve had writing about audio ever!
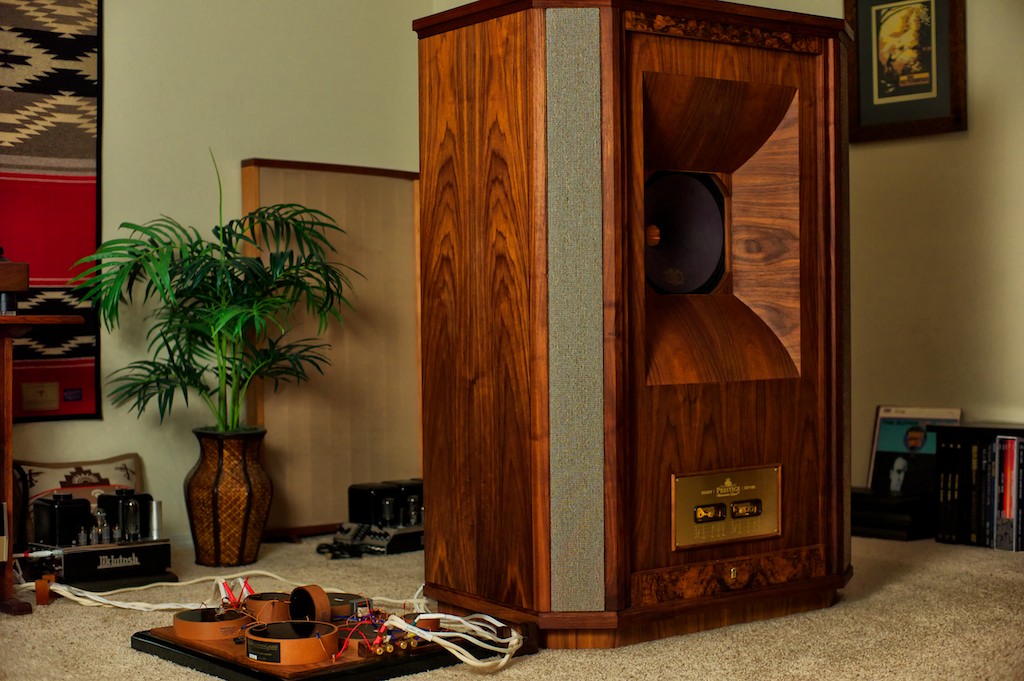
In that amazing project we took a ‘no holds barred’ approach to building ultra-high performance external crossovers for my Westminster Royal SE loudspeakers using the exotic, hand-crafted-in-Denmark, Duelund CAST capacitors, inductors, and resistors made by Duelund Coherent Audio’s Frederik Carøe and Magnus F. Pedersen.
The project team of Frederik Carøe (Duelund Coherent Audio, Denmark), Mark Coles (Sablon Audio, England, UK), Dr. Paul Mills (Tannoy, Scotland, UK), David Biancosino (Dave Biancosino, Answers in Art, Washington State, USA), Pete Riggle (Pete Riggle Audio Engineering, Washington State, USA), my buddy Stephaen Harrell (Six Moons, Washington State, USA) and yours truly, all contributed ideas, materials, and hard work that made this project a resounding success – thank you all!
To kick off the project we removed the stock Westminster Royal SE’s internal low & high frequency crossovers, and all of the internal wiring and connectors.
Then we rewired the Westminsters internally with Mark Coles’ stunning Sablon Audio Panatela component speaker cables (Issue 63) that he provided for the project, in one unbroken run from the Dual Concentric™ drivers’ connections …
… to the external crossovers’ outputs, eliminating all of the sonically degrading internal connectors.
Paul Mills helped me make sense of the Westminster’s crossover circuitry, patiently answered a bunch of my questions, and provided a set of the Tannoy autotransformers to use in the project.
Pete Riggle & Stephaen Harrell helped me breadboard the crossovers, which was immensely helpful.
My buddy Dave Biancosino, an expert woodworker, built some beautiful walnut & maple isolation platforms to mount the Duelund CAST components on, which were inspired by the Acoustic Revive Quartz Under-boards (Issue 47), which are my favorites for use under my electronics.
Mark Coles recommended we avoid sonically degrading solder connections wherever possible, and instead use WTB crimp connections, which we did.
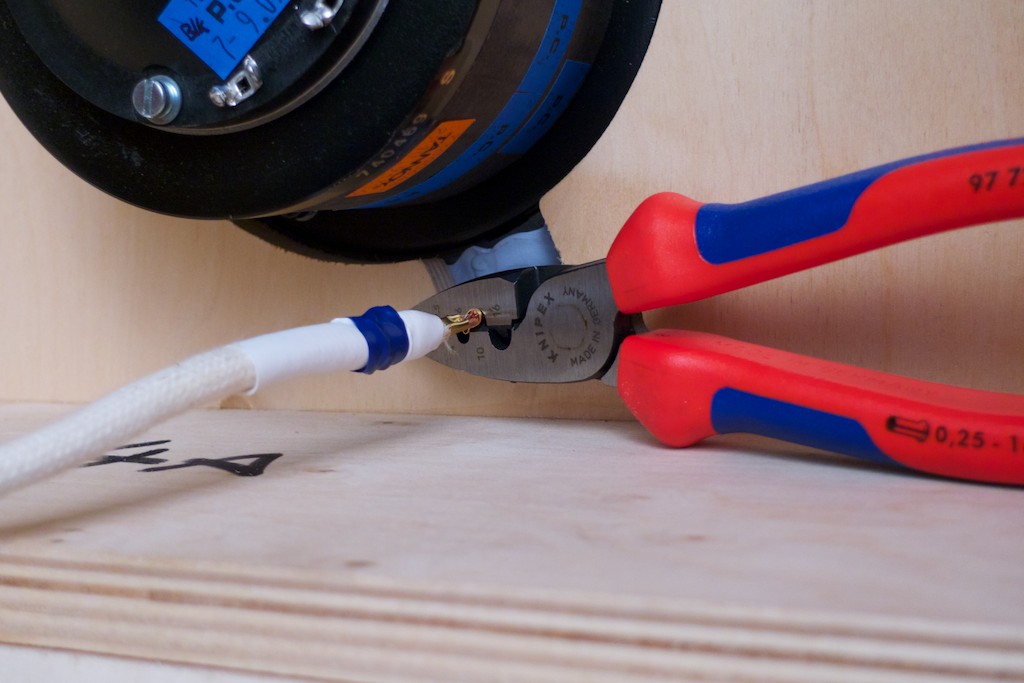
Mark also recommended we use the binding post bypass method for the inputs & outputs of the crossovers, and use Neotech wire internally in the crossover, which we also did.

Pete Riggle recommended the use of setscrew lugs from McMaster-Carr for mechanical connections of wires on the crossover boards. Not only do they sound better than solder connections, they made it a breeze to swap out components for this article.
I’m no doubt forgetting to mention some important details in my summary, so you’ll want to go back and read the Part 1 article from beginning to end for the full scoop.
The Sound and The Glory
If you read the original Duelund-WRSE Project article in Issue 70 of Positive Feedback Online, you know I was gobsmacked by the lofty performance level my Westminster Royal SE loudspeakers attained from the combination of the internal rewiring with Sablon Audio Panatela cabling, and the custom outboard crossovers we built with Duelund CAST capacitors, inductors, and resistors.
The increase in performance brought about by the Duelund-WRSE Project external crossovers was dramatic & profound from both a musical & sonic standpoint, and it made me realize that the murmurings I had heard from the audio underground about the ultimate performance potential of the WRSE loudspeakers being unimaginably higher than most people realized were in fact entirely true.
Westminster Royal SEs are fantastic loudspeakers straight out of their shipping containers, and being intimately familiar with their performance before The Project, and then hearing them afterwards, I was completely astonished by their über transformation!
As I reported on in my previous article, every aspect of reproduced sound was improved by the Duelund CAST components in the WRSE’s external crossovers. The Duelund components in my crossovers made much more of a performance improvement than I had thought possible, from the increased transparency in the high & low frequencies, to the increased sense of space & articulation in the bass region, to the oodles of natural detail, and their noticeably quieter background.
The Duelund CAST external crossovers were astonishingly quiet compared to my stock internal crossovers, which allowed music full of color and life to emerge from preternatural background quietness. The purity of sound gave real dividends in terms of musical nuance, low-level dynamics, natural timbral textures, and vivid chordal tonal colors, that made the music breathe with life and emotion during listening sessions.
I found it truly difficult to find words that would do full justice to what the Duelund CAST components were capable of delivering with my WRSEs, with their combination of sonic and musical prowess, and the intense emotional impact they unleashed in the music.
While I was settling into enjoying the results of those remarkable Duelund CAST external crossovers on my Westminsters, Frederik Carøe, the co-founder of Duelund Coherent Audio, inquired as to whether I’d like to try taking the Duelund-WRSE external crossovers to the next level of performance. As you probably guessed by the existence of this Part 2 article, that was a temptation I could not resist!
Silver Duelund CAST Capacitors
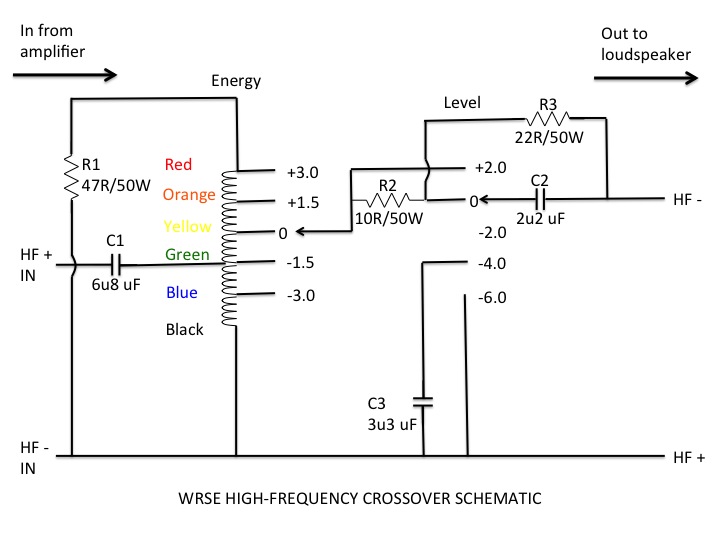
Frederik suggested trying two things: The first was to try a pair of silver Duelund CAST capacitors in the high-frequency crossovers. After discussing it, we decided on a pair of the silver 6.8uF Duelund CAST capacitors in place of the pair of copper 6.8uF Duelund CAST capacitors that we used in the C1 positions of WRSE high-frequency crossovers (see diagram below).
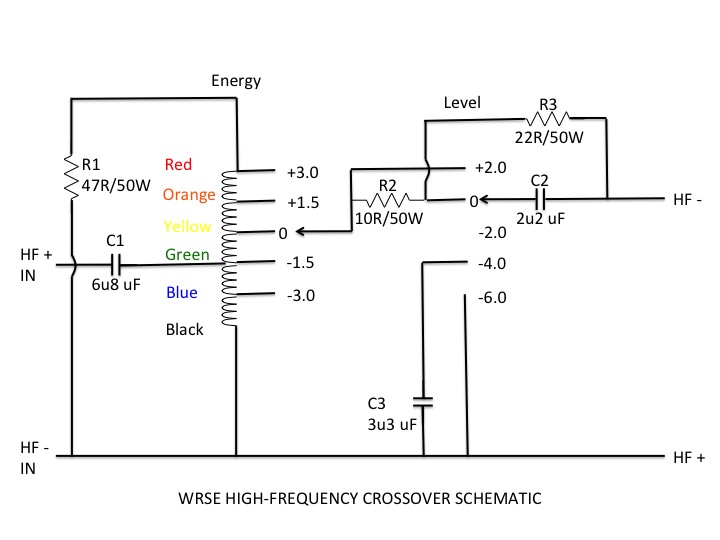
The C1 position 6.8uF capacitors are a great choice for experimentation, as their input connects directly to the incoming signal on HF+, and their output then connects to the autotransformer, which influences every component after that in the high-frequency crossover.
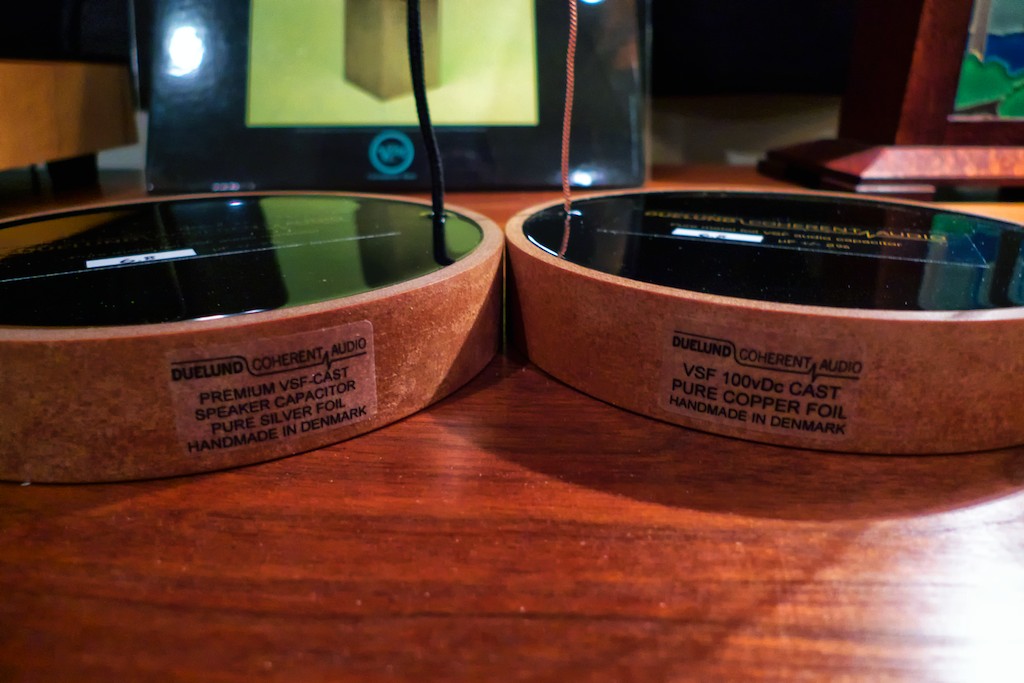
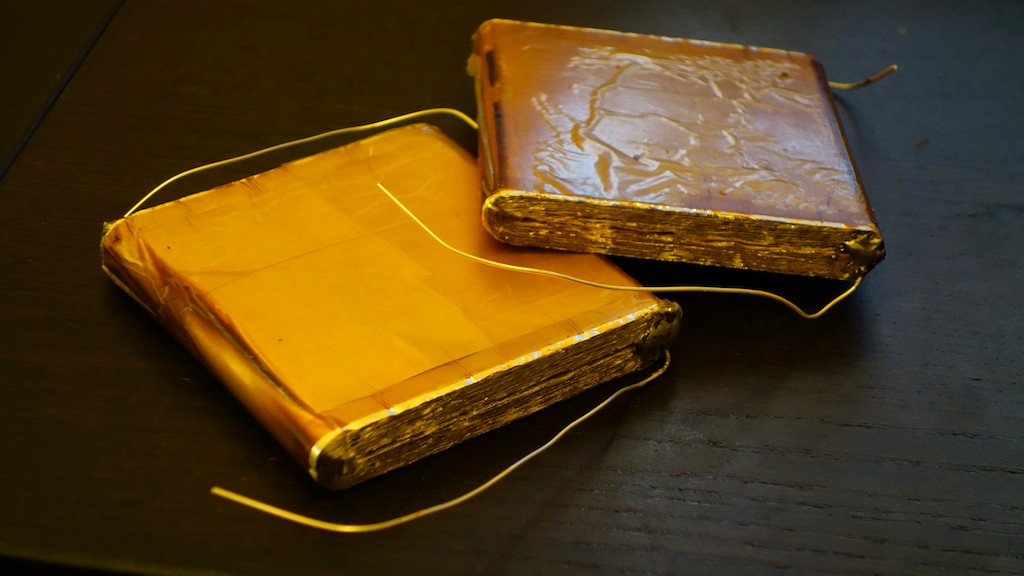
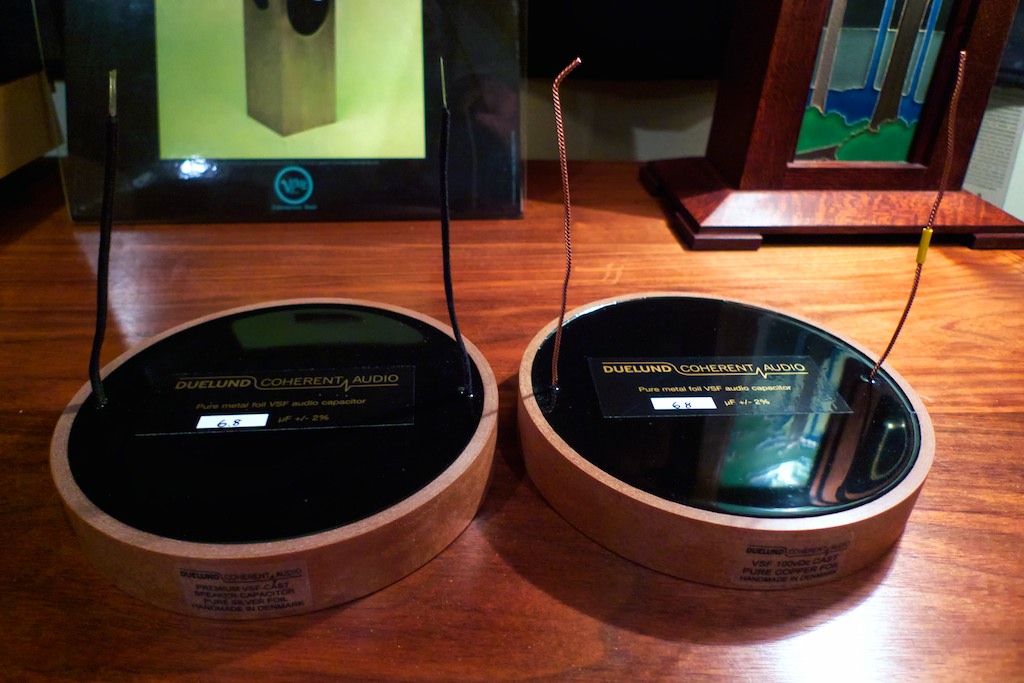
In the photo below you can see the silver 6.8uF Duelund CAST capacitor sitting to the left of the copper 6.8uF Duelund CAST capacitor.

The exteriors of the silver & copper CAST capacitors look nearly identical, but can be distinguished from each other by their leads: The silver Duelund CAST capacitors have silk covered silver ribbon leads, and the copper CAST capacitors have nude twisted copper wire leads.
Also, if you look closely at the photo below you can see the stickers on the ring casing are different, with ‘pure silver foil’ on the silver CAST capacitors, and ‘pure copper foil’ on the copper CAST capacitors.
In the first installment of the Duelund-WRSE Project, I described Frederik’s process for making the Duelund CAST copper foil paper-in-oil capacitors. The Duelund CAST silver foil paper-in-oil capacitors are made in exactly the same way, but using silver foil instead of copper foil.
I think the discussion from the first article about why the Duelund CAST capacitors are made the way they are bears repeating. I edited that earlier discussion to make it silver specific (e.g. I replaced ‘copper’ with ‘silver’ in the discussion):
“Frederik feels that the Duelund CAST silver foil paper-in-oil capacitors are the ultimate expression of Steen Duelund’s thirty-five years of research into perfecting capacitor design for audio use, and as Frederik said, “The legacy of Mr. Duelund is to never accept compromise, and that is a principle we proudly uphold in the silver Duelund CAST capacitors.”
Frederik told me that many capacitors today use an insulating plastic film as the dielectric because it makes them inexpensive to produce, but the problem with using plastic is that it noticeably degrades the audio signal, “With plastic you get what Steen would describe as an echo, masking the real details of the signal”.
So in the Duelund CAST capacitors Frederik doesn’t use any plastic, but rather only pure annealed soft silver foil in natural paper and oil, along with resonance control both inside and outside the capacitor. Each silver Duelund CAST capacitor is completely hand made in an incredibly labor intensive process:
“Foils of pure silver are initially wound with paper to a certain value that is a good deal over the needed capacitance.” (Note: the photo below is of the preliminary winding of the raw silver foils that Frederik made for the pair of 6.8uF capacitors that we used in the C1 positions of the high-frequency crossovers for this article).
Then the silver foil is put under vacuum pressure in an oil tank at high temperature for about a week, so that everything inside the winding undergoes vacuum impregnation and is permeated by oil. When this process is done, the resulting silver foil is wound by hand in a humidity and temperature-controlled room to an exact specification, and then it is placed back into the oil. Immediately after this process the silver winding is sealed by the use of a special lacquer, which is also used in the yacht industry to seal against moisture. This takes another week.”
“During this process a ring of vacuum impregnated paper has been readied with a base of our CAST material. The winding is heated and then placed in the ring & base assembly and CAST material is poured on top of it in five stages, with air bubbles in the CAST material being forced out by applying a very precisely controlled flame to the surface (yes really!). This process takes another week. Following this step the capacitor is measured and checked (as it has been at every step along the way), and if everything is ok, then we ship it to the customer. The total production time is typically six to eight weeks.”
Other than their obvious high quality, one of the most striking aspects of the silver Duelund CAST capacitors are their large size and heavy weight, which is due to their perfectionist design using natural materials and pure silver metal foil – they simply have to be larger than mass produced capacitors with this approach. (Note: notice in the photo below how large the 6.8uF Duelund CAST silver & copper capacitors are compared to the LP cover jacket that is a few inches behind them – they’re huge!)
Frederik says the careful selection of materials and this no holds barred style of design provides dramatic benefits for audio applications:
“From a performance standpoint, the main thing is an absolute lack of coloration, and a much more natural presentation – things don’t float around but stay locked in time and space. How you perceive and understand the layers in the music becomes greatly enhanced, primarily because of the sudden silence in between notes. Micro and macro dynamics take on a whole new meaning. Mr. Duelund would liken it to drinking Coke your entire life and then suddenly having a drink of pure water.””
One thing I haven’t mentioned is how much silver goes into making a silver 6.8uF Duelund CAST capacitor – a couple of kilograms, actually. The silver spot price was $632.28 per kilogram at the time Frederik made the 6.8uF Duelund CAST capacitors for the C1 positions of the crossovers for this article. That’s for raw silver and it doesn’t count the silver losses due to silver migration when making the silver foils (a substantial issue in the manufacturing of silver electronics. Here’s a link to a Bell article on silver migration from 1955, and silver migration is still an issue today, and it makes manufacturing components with silver very expensive compared to copper), or for the overage of silver foil needed before trimming it back to dial in the exact capacitance value, or the extra labor involved in prepping silver foils for the CAST process, etc.
Frederick has to base his prices for the silver CAST components on the silver spot prices at the time he buys it, because of the silver price fluctuations that occur, so prices can vary somewhat over time. I am trying to somewhat tactfully prepare you for how much the silver 6.8uF CAST capacitors cost – you need to brace yourself, because they cost a lot!
If you do the math you’ll realize there’s thousands of dollars in materials cost alone, so you know the final product is going to be very spendy. The copper 6.8uF Duelund CAST capacitors I have been happily using in the C1 positions of my high-frequency crossovers sold for about $667 USD each at the time I wrote the first Duelund-WRSE Project article for Positive Feedback Online. At the time Frederik made the silver 6.8uF Duelund CAST capacitors for this article the price came in at $7500 Euros each (that’s $10,289.48 USD each!). Yes, they are extraordinarily expensive, unfortunately that’s the cost of doing business with silver. The good news is that they do sound as good as they are expensive, which I’ll tell you all about in a moment.
Ok, now that I’ve put you into a complete state of shock over the price of those big silver 6.8uF Duelund CAST capacitors, let me tell you about something a little less expensive that I’ve found to be very wonderful.
Silver & Copper Duelund CAST Autotransformers
Frederik’s second suggestion was to try a pair of silver Duelund CAST autotransformers in place of the stock Tannoy autotransformers used in the high frequency crossovers (see diagram above).
“Jeff,” you say, “I didn’t know Duelund Coherent Audio made autotransformers.” Well, actually, up until now they didn’t. The Duelund CAST autotransformers were developed specifically for the Duelund-WRSE Project Part 2 article, just as the innovative Duelund CAST Mylar 200uF capacitors were developed specifically for the original Duelund-WRSE article, but Frederik has decided to make them available on a limited basis as a custom order, which I’ll tell you all the details about in a moment.
A photo of the silver Duelund CAST autotransformers is shown below.
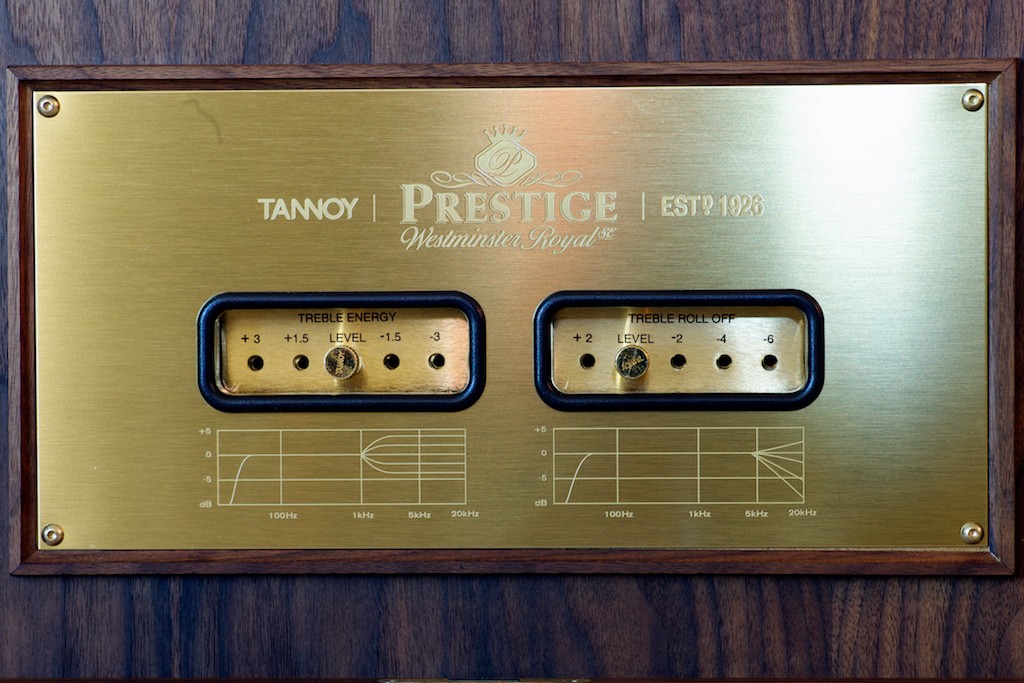
For those not intimately familiar with the design of the WRSE high-frequency crossovers, I thought I should mention that they include treble controls that allow the owner to adjust the high frequency energy and roll-off via aforementioned autotransformers in the crossover circuits, so that the high frequencies can be tailored to the owner’s room, associated equipment, and personal preferences.
The role of the WRSE’s high-frequency crossover is to allow the high-frequency information from the music signal to pass through to the high-frequency compression horn driver unit, while filtering out the low-frequency information.
Inversely, the role of the low-frequency crossover is to allow the low-frequency information from the music signal to pass through to the fifteen-inch direct radiating low frequency driver while filtering out the high frequency information.
The WRSE crossovers use a combination of capacitors, inductors, resistors, and in the case of the high-frequency crossovers – autotransformers – to implement the filtering of the frequencies, to match the two drivers differing efficiencies, and to blend the frequency response of the two drivers into one smooth composite response.
So it turns out that the autotransformers in the high-frequency circuit are a really big deal with respect to the functioning and performance of the crossover, and according to Dr. Paul Mills (Director of Research & Engineering at Tannoy), the autotransformer is a very important part of the circuit and cannot be omitted even if you don’t plan on using the adjustability it brings to the high frequencies.
Given the key role of the autotransformers in the high-frequency crossovers, a number of my fellow Westminster Royal SE owners told me that they would like to be able to replace the stock Tannoy autotransformer in their premium outboard crossovers with an equally premium silver autotransformer. Even Paul mentioned that he would like to give silver autotransformers a try in the Westminster Royale SE. We inquired everywhere we could think of, but there just weren’t any autotransformers out there to purchase like we needed. So what to do?
Frederik to the rescue: Fortunately for all of us, Frederik decided he wanted to try his hand at making some autotransformers for Westminster Royal SE, and not just any autotransformers, but Duelund CAST autotransformers made to the same high standard as all Duelund CAST components, which was the perfect solution for the Duelund-WRSE Project!
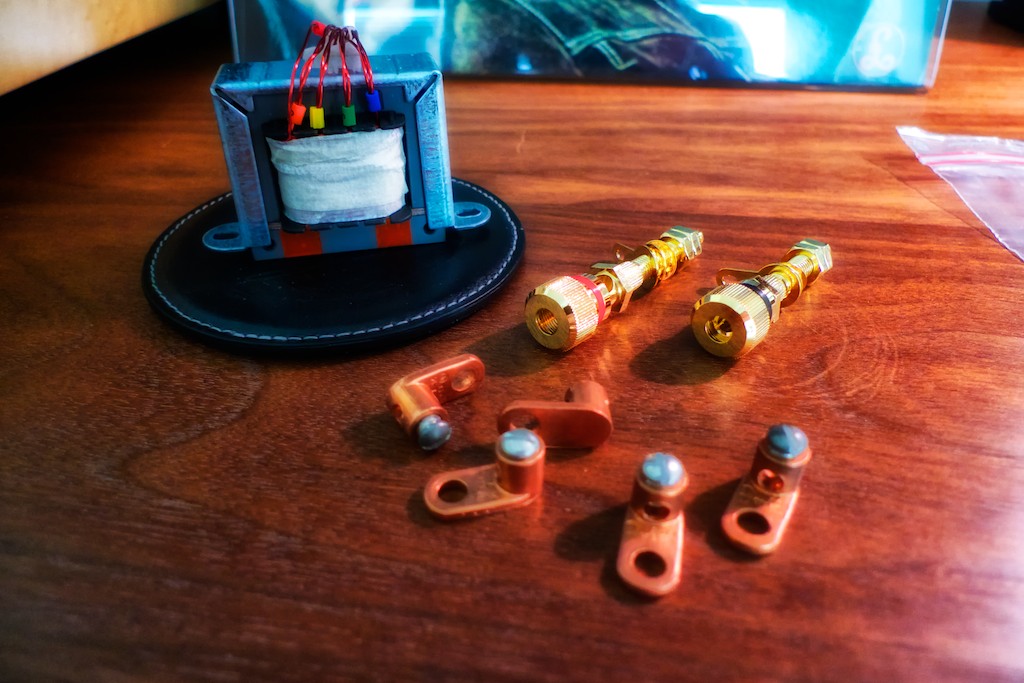
My friend Ron Barbee and me measured the stock Tannoy autotransformer for inductance (mH) and resistance (Ohms) on all the taps (blue (-3), green (-1.5), yellow (0), orange (+1.5), and red (+3)) relative to ground (the black lead) and sent the information to Frederik. Fellow Westminster Royal SE enthusiast, Jignesh, also sent one of his stock Tannoy autotransformers to Frederik for measurements, just to make sure we had it right.
It turns out that Tannoy uses the same autotransformers in all their loudspeaker crossovers that employ the use of autotransformers, so the new Duelund CAST autotransformers are compatible for all those same Tannoy models. So, for example, the same Duelund CAST autotransformers that work in my Westminster Royal SE loudspeakers’ external crossovers, will also work in your Canterbury SEs’ external crossovers. Pretty cool eh?
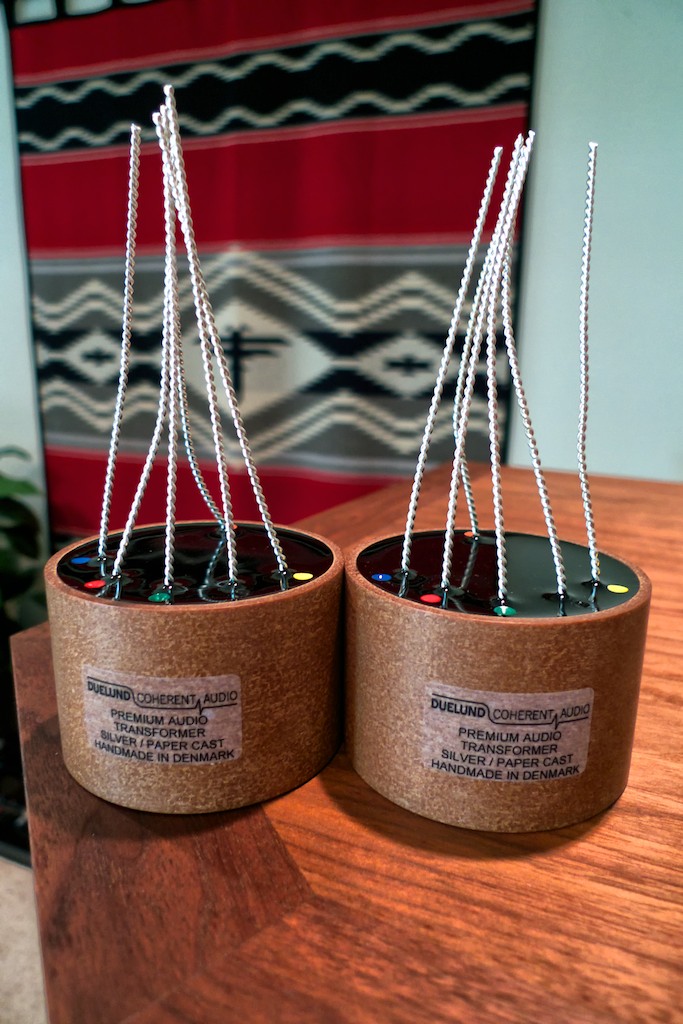
In the photo below you can see the stock Tannoy autotransformer on the left and the silver Duelund CAST autotransformer on the right.
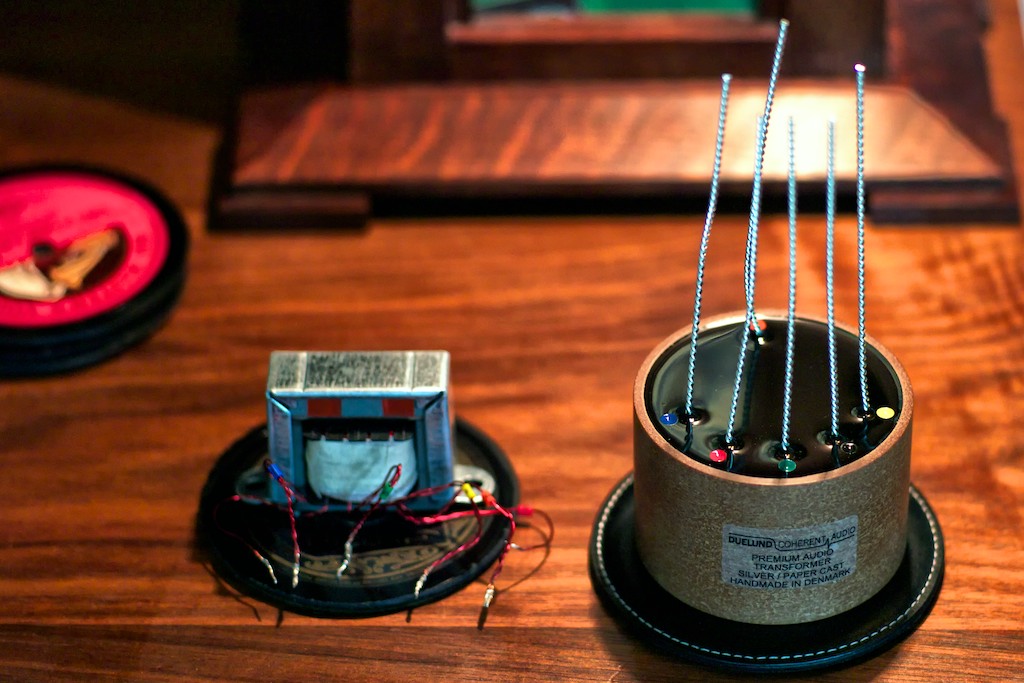
Like all Duelund CAST components, the CAST autotransformers are available in both copper & silver models, and are impressive in their extraordinary quality of materials & construction and fit & finish. The Duelund CAST autotransformers are completely handcrafted in what is an even more involved process than that for the Duelund CAST capacitors that I just described.
A photo of the copper Duelund CAST autotransformers is shown below.
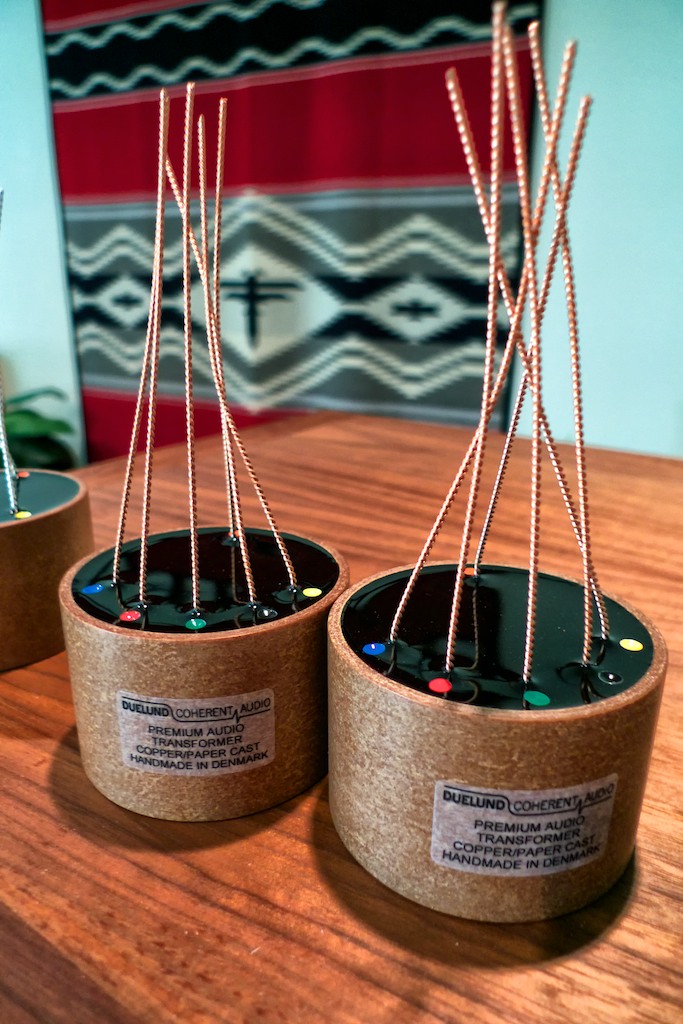
Each autotransformer is wound around a core using copper or silver wire and paper, with each tap (blue, green, yellow, orange, and red) measured against the ground (black) to establish exact inductance and resistance values. I asked Frederik to tell me more details about the cores and construction methods, but he understandably didn’t want to give away too many secrets about details. However, Frederik did tell me that the core is a “material with very low magnetic losses, namely low hysteresis and eddy current losses, laminations lower than 50um thick, and a substantial air gap.”
Finally, once construction of an autotransformer is complete, it is installed into a CAST enclosure in similar fashion to what Frederik described for the CAST capacitors: “During this process a ring of vacuum impregnated paper has been readied with a base of our CAST material. The winding is heated and then placed in the ring & base assembly and CAST material is poured on top of it in five stages, with air bubbles in the CAST material being forced out by applying a very precisely controlled flame to the surface (yes really!). This process takes another week. Following this step the autotransformer is measured and checked (as it has been at every step along the way), and if everything is ok, then we ship it to the customer. The total production time is typically six to eight weeks.”
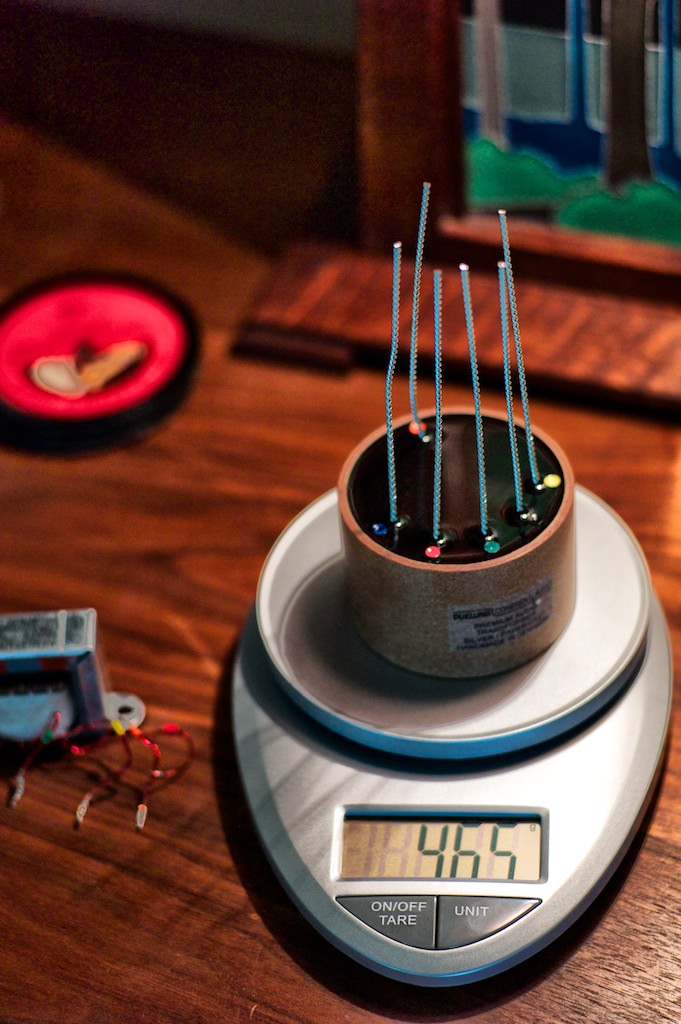
Just for kicks I put the stock Tannoy autotransformer on a scale and found out it weighed 266 grams.
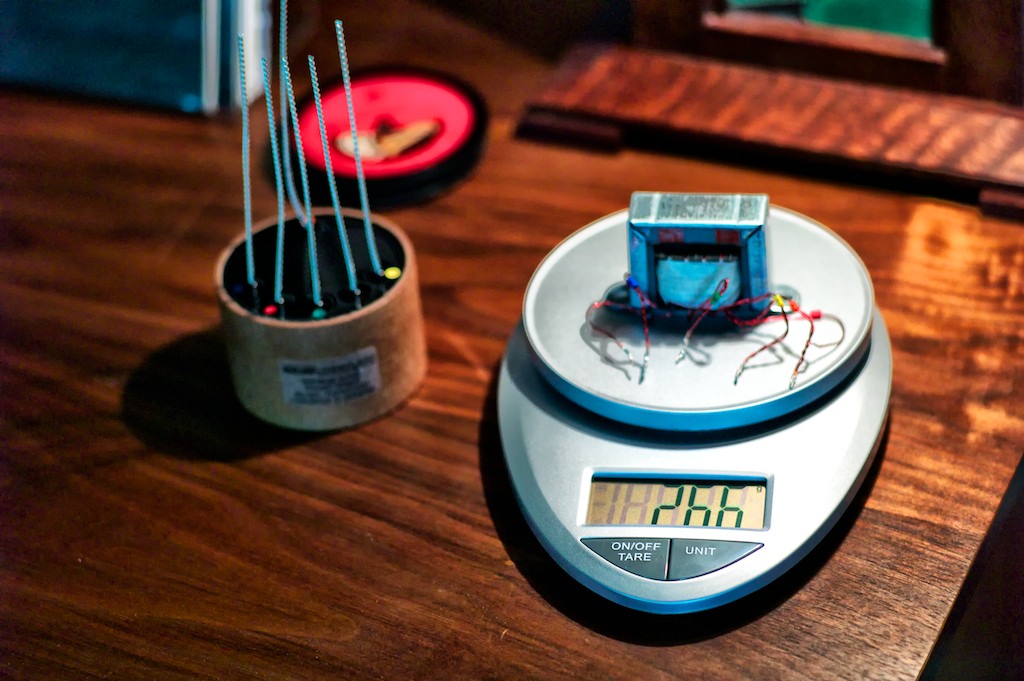
When I put the silver Duelund CAST autotransformer on the same scale it came in at a whopping 465 grams!
The Duelund CAST Autotransformers are an even more exotic product than the Duelund CAST capacitors, inductors, and resisters, and require considerably more hands-on attention to make, given their multiple taps and leads, so you know they are going to be expensive. However, in an effort to control costs Frederik has decided to sell them direct to customers instead of through dealers and distributors:
“We plan on selling these direct. They are very low volume, and very expensive to make. Adding in dealers’ and distributors’ markup would make them far too costly. Also, since we need to talk to the client directly and measure his components it seems the best way to go.”
Frederik told me the pricing (based on current materials & labor costs) are €3200 euros ($4422.72 USD) for a pair of CAST Copper Autotransformers, and €4500 euros ($6219.45 USD) for a pair of CAST Silver Autotransformers, as seen in the photos.
While the Duelund CAST autotransformers are expensive, I do believe that their pricing structure is fair given their handcrafted and specialized nature. Autotransformers are transformers with multiple taps (five taps in this case), and there just aren’t any premium autotransformers out there to compare to due to their specialized nature. I think the closest comparison for autotransformers are step-up transformers (SUT) for moving coil phono cartridges, even though MC SUTs aren’t as complex in their design as an autotransformer, and they are generally built on one chassis rather than two chassis, like the Duelund CAST autotransformers are.
For example, the basic Auditorium 23 Standard SUT I have retails for about $995 USD. The Auditorium 23 Hommage T1 & Hommage T2 SUTs both cost $4995 USD. Bob’s Devices CineMag 1131 SUT sells for $1195. The Audio Note AN-S8 Silver SUT sells for $10,500 USD. The Kondo KSL SFz Silver SUT is $14,000 USD. So a pair of Duelund CAST copper autotransformers for $4423 USD, or a pair of Duelund CAST silver autotransformers for $6219 USD fits midway within the range of pricing for the SUTs mentioned.
My conclusion is that for a custom, hand-wound, hand-made, ultra-quality pair of Duelund CAST autotransformers with their 5 taps, their pricing is within the range of the market. They are expensive, but they are comparable to what other similar products cost.
A Refresher Walk-Through of the Duelund High-Frequency Crossover
Before I substitute the copper & silver Duelund CAST autotransformers for the stock Tannoy autotransformers, let’s take a ‘walk-through’ of the Part 1 Duelund-WRSE CAST high-frequency crossover as a refresher.
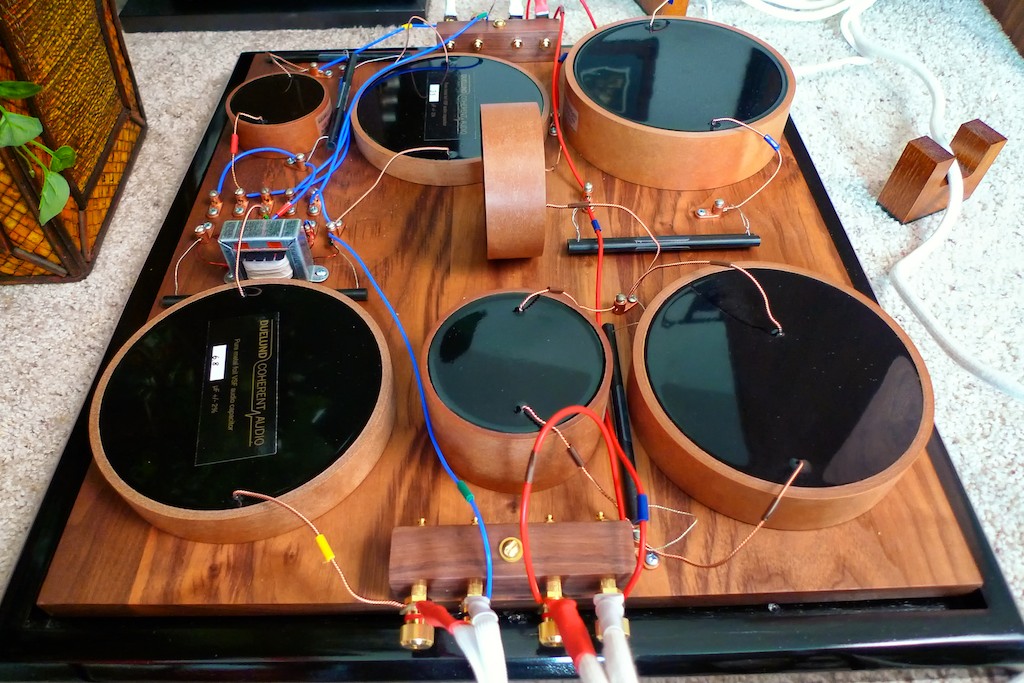
Below is my high-frequency crossover schematic, which will help make the photos and discussion to come a little easier to follow (I hope).
I’ll start at the left side of the schematic where the signal comes in from the amplifier, and then ‘walk’ my way across towards the right, where the signal goes out to the loudspeaker.
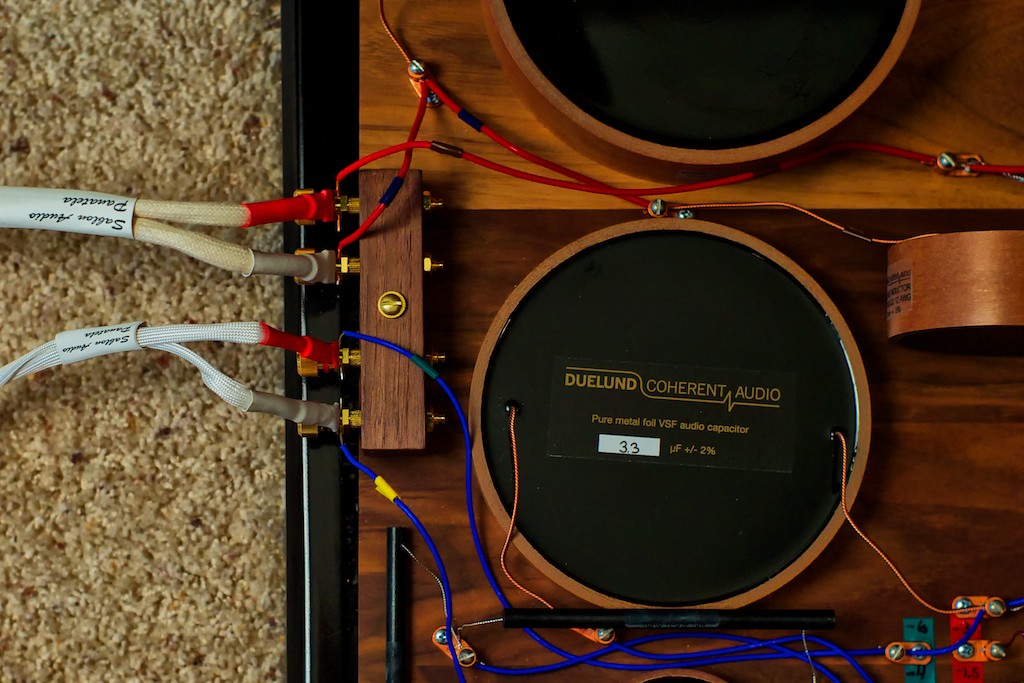
In the photo below you can see the Sablon Audio Panatela speaker cables coming in from the amplifier on the left side of the Duelund CAST external crossover, where they attach to the HF+ IN (red) and the HF- IN (white) binding posts, which are the left top pair in the photo below.
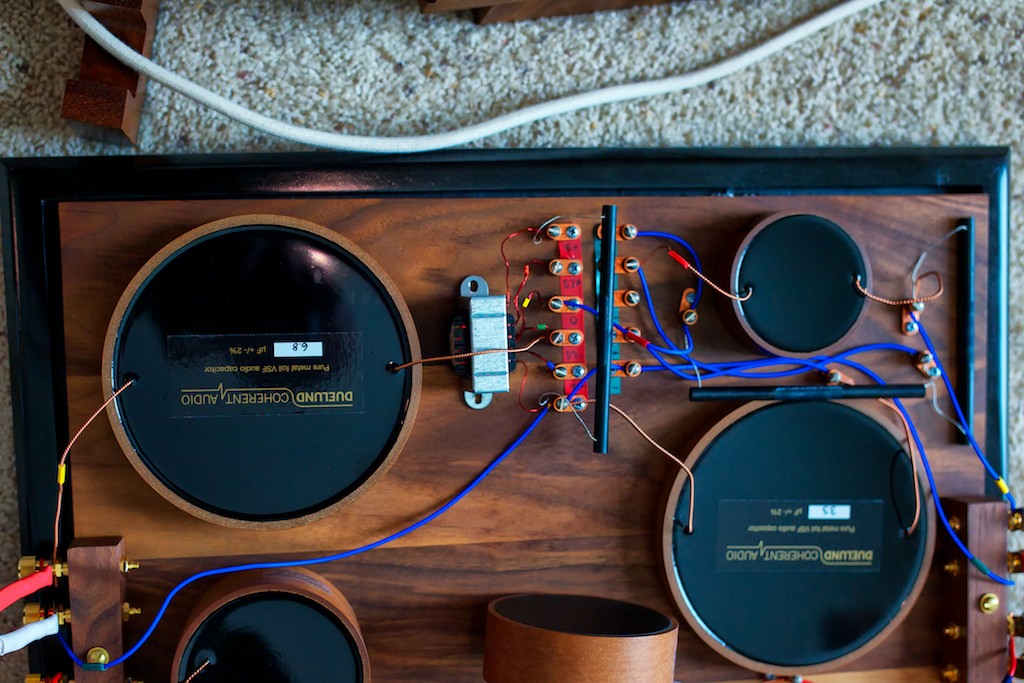
The high-frequency part of the crossover is the upper half of the crossover board with the blue wiring. The pair of binding posts just below the HF+ IN (red) and the HF- IN (white) binding posts, connects to the Duelund CAST low-frequency crossover, which is the lower half of the crossover board, distinguished by the red wiring.
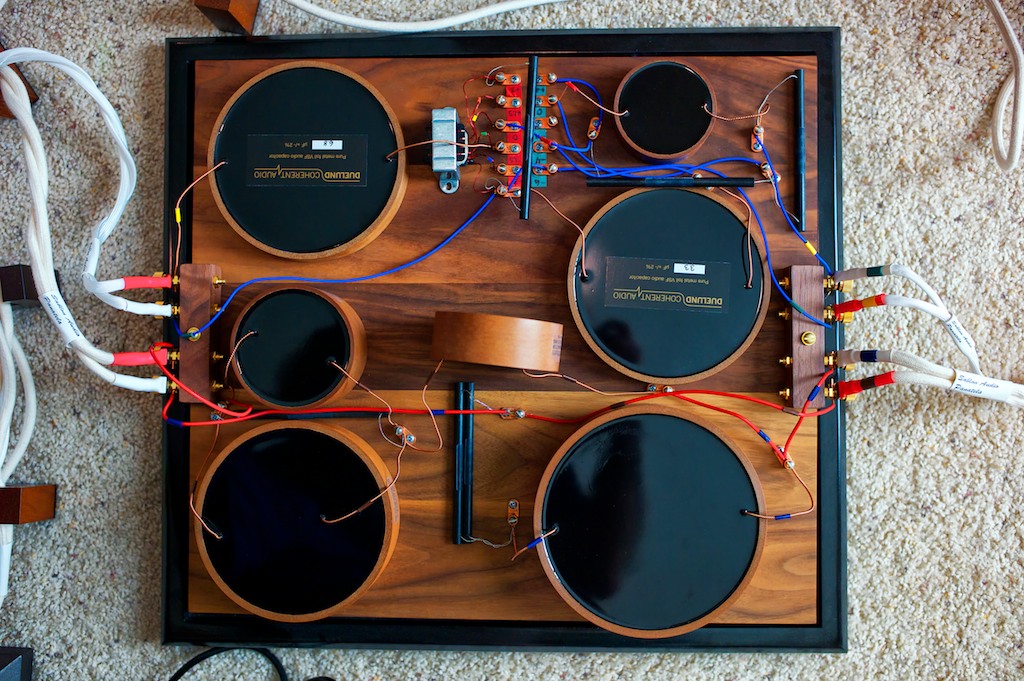
If you look closely at the photo above you can see the details of how the binding post bypass method works for connecting the Panatela speaker cables to the Duelund CAST crossover’s internal wiring: The lead (yellow tape identifier) from the Duelund 6.8 uF CAST capacitor (C1, upper left in the photo) inserts into the HF+ IN (top) binding post’s wire passage. The silver spade connector from the positive (red) Panatela cable coming in from the amplifier slips over the binding post shaft directly in front of the wire lead from the Duelund capacitor. When the binding post cap nut is tightened down it clamps the Panatela’s spade and the Duelund CAST capacitor lead wire tightly together to make the electrical connection, thus avoiding a signal degrading solder connection, and making for the most direct connection of the speaker cables spade connector possible to the crossover’s internal wiring.
On the HF- IN (white) binding post a 20-gauge Neotech silver wire (blue) is inserted into the binding post’s wire passage. The silver spade connector from the negative (white) Panatela speaker cable coming in from the amplifier slips over the binding post shaft directly in front of the Neotech silver wire lead, and when the binding post cap nut is tightened down it clamps the Panatela’s spade and the Neotech silver wire tightly together.
As passing the signal through binding posts as part of a circuit degrades the signal somewhat, the binding post bypass method is a truly nice way to get the binding posts out of the circuit and at the same time avoiding an equally signal degrading solder connection!
In the photo above you can see the entry lead (with the yellow tape marker) going from the HF+ IN binding post into the C1 Duelund 6.8 uF CAST capacitor, and from the HF- IN binding post you can see the 20-gauge Neotech silver wire (blue wire with green tape marker) going off into the distance to connect at the setscrew lug that connects to the black wire on the autotransformer, the R1 Duelund 47R/5W Carbon/Silver CAST resistor, and the C3 Duelund 3.3 uF CAST capacitor.
The copper setscrew lugs serve the same sort of clamping function as the binding posts do in the binding post bypass method, where the setscrew simply clamps the two wires tightly together in the lug for a signal-preserving solder-free connection. To maintain as much signal fidelity as possible, there are absolutely no solder joints used in the Duelund CAST external crossovers. Only the leads from the Duelund CAST components, connected where necessary with the shortest possible lengths of the ultra-quality Neotech hookup wire, make up all the wiring used in the circuits, and all connections are made with the setscrew lugs.
In the photo above you can see the lead from the Duelund 6.8 uF CAST capacitor (C1) inserting into the red-tape side -1.5 dB treble energy level setscrew lug where it connects to the green lead of the autotransformer (the 3rd red-side setscrew lug up from the bottom of the photo).
The photo above also shows the aforementioned 20-gauge Neotech silver wire (blue) coming in from the negative binding post and inserting into the bottom red-tape side setscrew lug that connects the black wire on the autotransformer, the R1 Duelund 47R/5W Carbon/Silver CAST resistor, and the C3 Duelund 3.3 uF CAST capacitor.
You can see the R1 Duelund 47R/5W Carbon/Silver CAST resistor positioned between the C1 Duelund 6.8 uF CAST capacitor and the autotransformer. Note that R1 Duelund 47R/5W Carbon/Silver CAST resistor also inserts into the red-side +3 dB treble energy level setscrew lug (the top setscrew lug on the red-tape side in the photo below).
As with the stock internal Tannoy WRSE crossover, the Duelund CAST external crossover allows the treble energy level of the tweeter to be adjusted over a range of -3 dB to +3 dB by selecting different taps on the autotransformer that increase or decrease the tweeter energy level in 1.5 dB steps from the crossover point.
In the Duelund CAST crossover this is accomplished by moving a jumper wire in the crossover to connect to the appropriate autotransformer tap (from top to bottom in the photo: the red tap is +3 dB, the orange tap is +1.5 dB, the yellow tap is +0 dB, the green tap -1.5 dB, and the blue tap -3 dB).
In the photo you can see a length of 20-gauge Neotech silver wire (blue with a red tape marker) that is inserted into the +0 dB treble energy level setscrew lug (on the ‘red-side’) that connects it to the yellow tap (+0 dB) from the autotransformer. This is the jumper wire that can be moved between the different red-side setscrew lugs corresponding to the autotransformer taps that adjust the treble energy level of the tweeter. In the photo, the Neotech jumper wire is inserted into the +0 dB treble energy level setscrew lug, which means that there is zero alteration of the tweeter’s treble energy level.
As we move to the right in the photo (and schematic), the other end of Neotech movable jumper wire is connected to the R2 Duelund 10R/10W Carbon/Silver CAST resistor (which is the horizontal resistor in the middle of the photo) via a setscrew lug that you can see just to the left of the C2 2.2 uF Duelund CAST capacitor (the capacitor in the upper right of the photo). A length of Neotech silver wire also goes from this setscrew lug to the +2 dB treble roll-off control that is at the top of the green tape strip in the photo.
A length of 20-gauge Neotech silver wire (blue) goes from the -3 dB treble energy level setscrew lug (red side) to the -6 dB treble roll-off level setscrew lug (green side), and then all the way to the HF+ OUT binding post that goes out to the loudspeaker, where it is clamped to the silver spade of the positive lead (red) of the internal WRSE Panatela wire (lower right-hand corner of the photo).
The treble roll-off circuitry functions as a variable low pass filter, which I’ll explain in more detail in a moment, but first let me describe what it does visually by using the diagrams from the front panel of the WRSE treble controls, which I think will give you more of an intuitive feel for what the circuitry does.
If you look at the photo below, the diagram underneath the treble energy level control (the left control) shows that when the different transformer taps are selected the treble energy level is changed in steps over the range of +3 dB to -3 dB at the crossover point, but the change in dB is linear in response with increasing frequency from the crossover point.
In the diagram underneath the treble roll-off level control, you can see that the change in dB response is non-linear with increasing frequency. The treble roll-off control provides an increasingly greater dB change in treble response as a function of increasing frequency in a smooth curve (i.e. dB response ‘rolls-off’ with increasing frequency).

In discussing the treble roll-off control with Paul Mills, he told me that its inclusion in the WRSE’s circuit is largely historical in nature, as its original purpose was to tailor the high-frequency response to help reduce the hiss on 78-rpm records. Paul told me that he had considered removing the treble roll-off control from the circuit as it doesn’t really serve a useful purpose for modern recordings, but a very enthusiastic core group of Westminster owners who still listen to 78s wanted him to retain it, so he did. Paul advises those not listening to 78s on their Westminsters to ignore the treble roll-off control!
Ok, now let’s continue our walk across the high-frequency crossover. Take a look at the row of setscrew lugs on the green tape in the photo below – these are the treble roll-off level controls for the Duelund CAST crossover. If you have a lot of 78s to listen to you might want to change the treble roll off setting from the normal +0 dB setting to +2 dB, -2 dB, -4 dB, or -6 dB to best flatter your particular 78 rpm record.
To change the treble roll-off to best complement the 78-rpm record you want to listen to, you would move the lead of the C2 2.2 uF Duelund CAST capacitor (marked with the red tape in the photo) to the setscrew lug with the desired level of roll-off. (It’s the capacitor in upper right of the photo above.)
+2 dB setting: If you insert the C2 2.2 uF Duelund CAST capacitor lead into the +2 dB setscrew lug, it places the R2 Duelund 10R/10W Carbon/Silver CAST resistor and the R3 Duelund 22R/10W Carbon/Silver CAST resistor in parallel with the C2 2.2 uF Duelund CAST capacitor to give +2 dB of roll-off on its way to HF- OUT.
+0 dB setting: If you insert the C2 2.2 uF Duelund CAST capacitor lead into the +0 dB setscrew lug, it places the R2 Duelund 10R/10W Carbon/Silver CAST resistor in series with the C2 2.2 uF Duelund CAST capacitor, and the R3 Duelund 22R/10W Carbon/Silver CAST resistor in parallel with the C2 2.2 uF Duelund CAST capacitor, to give 0 dB of roll-off on its way to HF- OUT.
-2 dB setting: If you insert the C2 2.2 uF Duelund CAST capacitor lead into the -2 dB setscrew lug, it drops the C2 2.2 uF Duelund CAST capacitor out of the circuit, and the HF+ IN signal from the transformer tap goes through the R2 Duelund 10R/10W Carbon/Silver CAST resistor and the R3 Duelund 22R/10W Carbon/Silver CAST resistor, to give -2 dB of roll-off on its way to HF- OUT.
-4 dB setting: If you insert the C2 2.2 uF Duelund CAST capacitor lead into the -4 dB setscrew lug, the HF+ IN signal from the transformer tap goes through the R2 Duelund 10R/10W Carbon/Silver CAST resistor and the R3 Duelund 22R/10W Carbon/Silver CAST resistor on its way to HF- OUT, and it places the C2 2.2 uF Duelund CAST capacitor and the C3 3.3 uF Duelund CAST capacitor in series across the driver terminals to act as a low pass filter, to give -4 dB of roll-off.
-6 dB setting: If you insert the C2 2.2 uF Duelund CAST capacitor lead into the -6 dB setscrew lug, the HF+ IN signal from the transformer tap goes through the R2 Duelund 10R/10W Carbon/Silver CAST resistor and the R3 Duelund 22R/10W Carbon/Silver CAST resistor on its way to HF- OUT, and it places the C2 2.2 uF Duelund CAST capacitor across the driver terminals to act as a low pass filter, to give -6 dB of roll-off.
Once the incoming signal goes through the treble roll-off level control it ends up at the HF-/HF+ OUT pair of binding posts (the top pair of binding posts on the right side of the photo above), which connects to the Panatela internal cabling from the Westminsters using the binding post bypass technique as described earlier.
Ok, that’s it for the refresher walk-through of the high-frequency section of the Duelund CAST external crossover.
The Review System
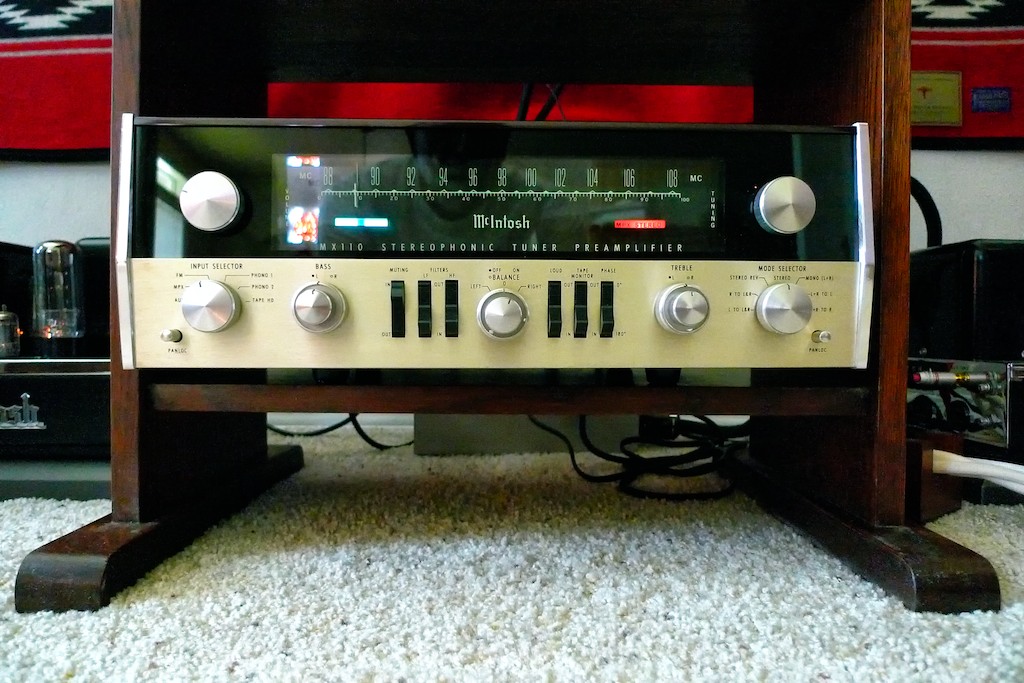
During the time that I wrote the final listening impressions for this article, I used an EMT TSD-15 phono cartridge mounted on a VPI Classic turntable, with a restored vintage mint+ McIntosh MX110Z tuner-preamplifier-phono equalizer from vintage vacuum-tube specialists Tom Manley and Terry DeWick in Knoxville, Tennessee.
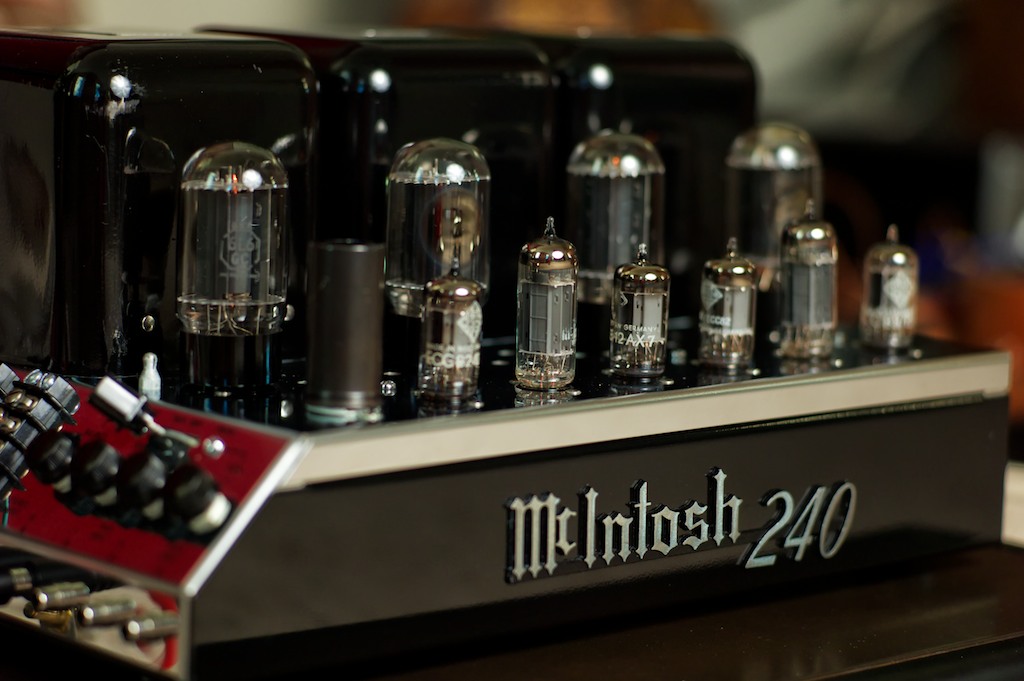
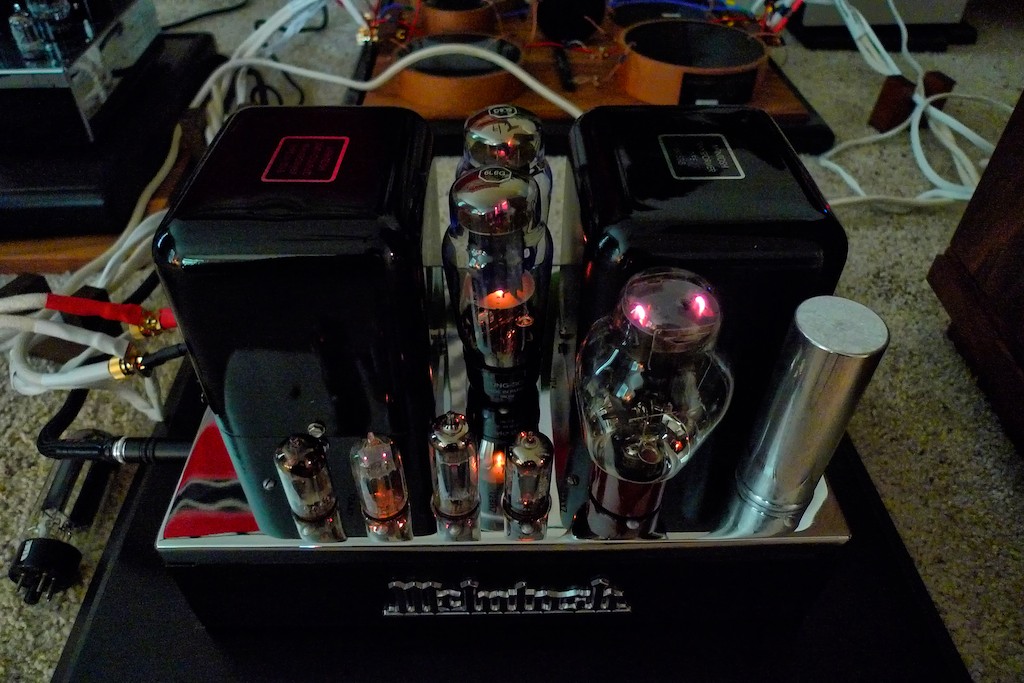
The front-end electronics drove either my restored vintage mint McIntosh MC240 stereo 6L6GC vacuum tube amplifier, also from Tom Manley & Terry DeWick, or alternatively, my restored McIntosh MC30 mono amplifiers from Yves Beauvais at Vintage Vacuum Audio. My MC30 monos and MC240 stereo amp were placed on either Acoustic Revive RST-38 or TB-38 Quartz Under-Boards, and the RAF-48 Air Floating Board for isolation.
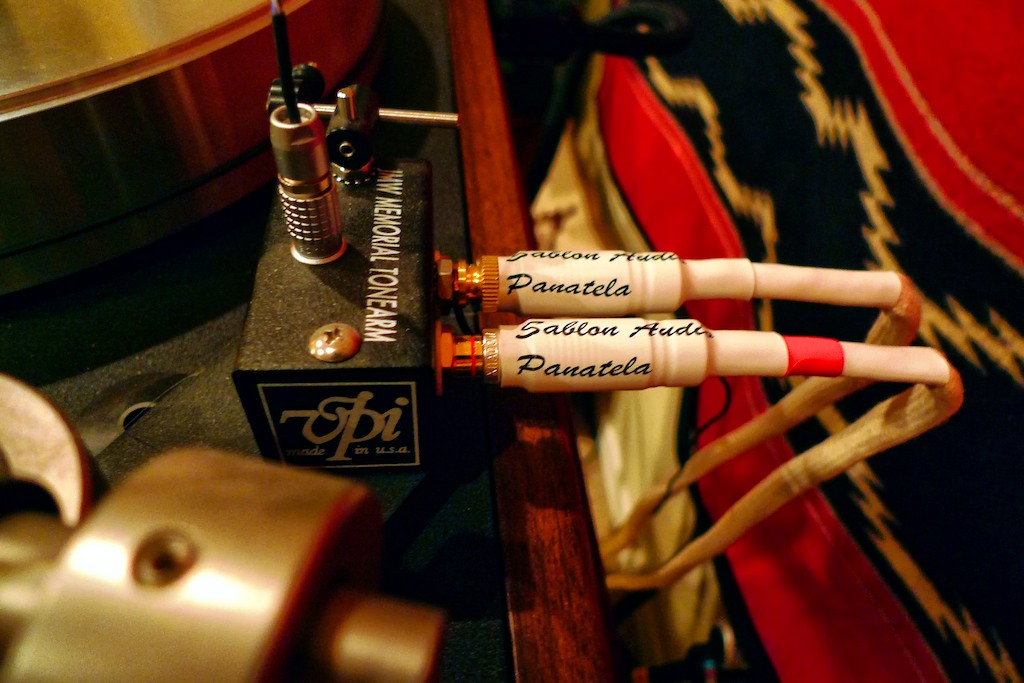
I have been using the superb Sablon Audio Panatela interconnects for my turntable to preamp, and preamp to amplifier connections. With the vintage McIntosh MX110Z resident in my system, I was able to use a 1-meter length of Panatela interconnects from my VPI Classic turntable to the MX110Z, and a 1.5-meter length of Panatela interconnects from the MX110Z to my McIntosh amplifiers. From my McIntosh amplifiers I used a 1-meter set of Panatela component speaker cables to the Duelund CAST external crossovers, and an 8-feet pair of Panatela component speaker cables from the Duelund CAST external crossovers to the Westminster Royal SEs’ Dual Concentric™ driver connections, which gave me an all Panatela cable set from source to loudspeaker drivers.
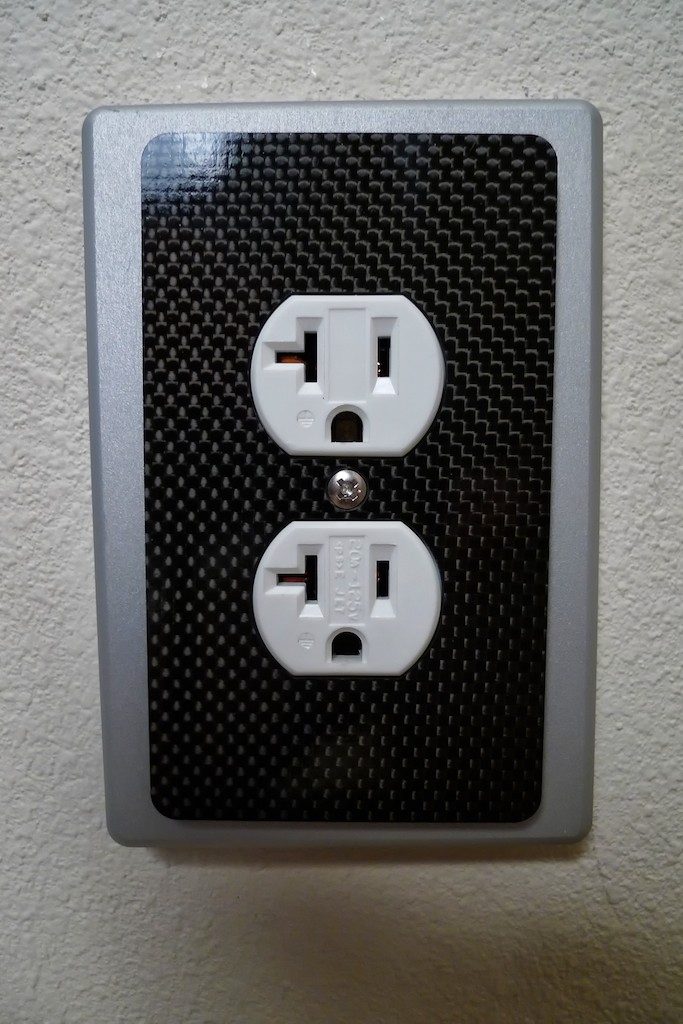
I used an Acoustic Revive Power Reference AC power cord to connect my VPI Classic turntable to the Acoustic Revive RPT-4 Ultimate Power Distributor. My vintage McIntosh electronics all have captive power cords, which were plugged into the Acoustic Revive RPT-4 Ultimate Power Distributor, which in turn was plugged into my wall outlet via an Acoustic Revive Power Reference AC power cord. One of these days I am going to figure out how to adapt Mark Cole’s superb Sablon Audio power cords to my vintage Macs, but it hasn’t got to the top of my to-do list just yet. I used the superb combination of an Acoustic Revive CB-1DB receptacle base plate, CFRP-1F carbon fiber outlet plate, CS-F2 Outlet Stabilizer, and an Oyaide R-0 receptacle installed into my wall outlet, to power my system.
Ok, that's it for now. After its publication at Positive Feedback Online, the rest of the article will appear here.
Thanks for stopping by!