


I'm writing non-stop this weekend trying to wrap up my review of the impressive Woody SPU Tonearm™ by Pete Riggle Audio Engineering for the November-December issue of Positive Feedback, and I thought you'd enjoy reading a sneak peek before it hits the presses in a few weeks.
Enjoy!
The Woody SPU Tonearm™ from Pete Riggle Audio Engineering
By Jeff Day
The Woody SPU Tonearm from Pete Riggle Audio Engineering.
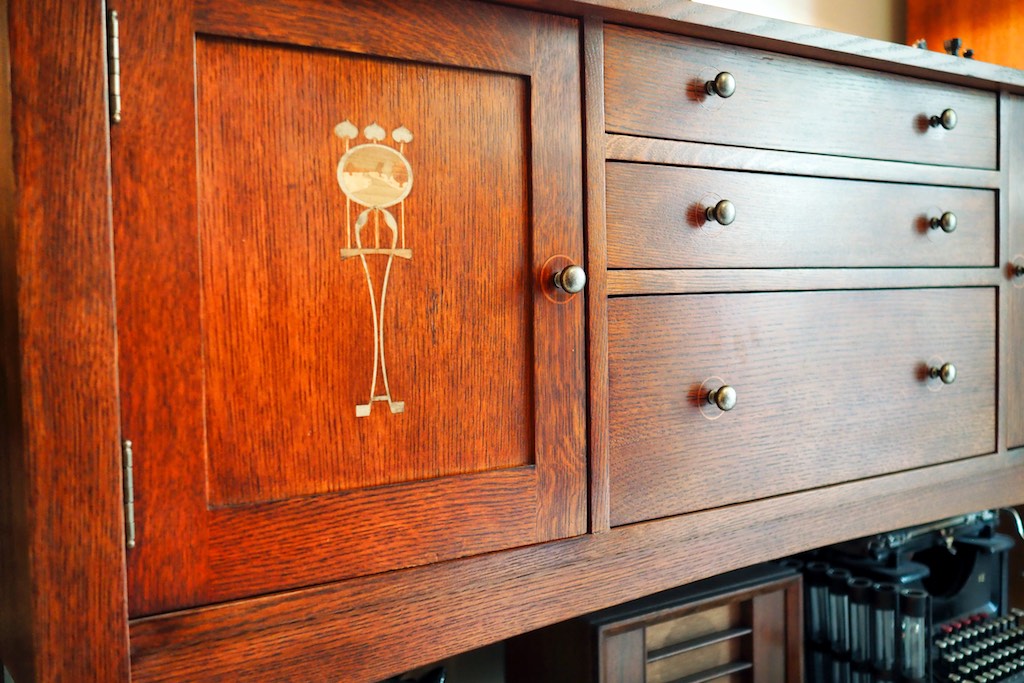
If Gustav Stickley (1853 – 1942), the renowned figure of the Arts & Crafts movement in America, were to have made a tonearm to complement his American Craftsman style of furniture, what would it have looked like?
I like to imagine that if Stickley had made a tonearm it would have looked a lot like the Woody SPU Tonearm™ from Pete Riggle Audio Engineering.
I really love the Stickley design aesthetic, and I treasure the way too few examples of Stickley furniture that I have in my home. I so admire the Stickley values of beauty, simplicity, and quality in product, which are production values that seem so rare today in popular consumer culture.
The Stickley wood finish.
The Stickley aesthetic of woods stained to emphasize the natural beauty of their grain, the hammered & patinated metal hardware, and an exposed architecture that emphasized the quality of their design, were hallmarks of the Stickley design aesthetic.
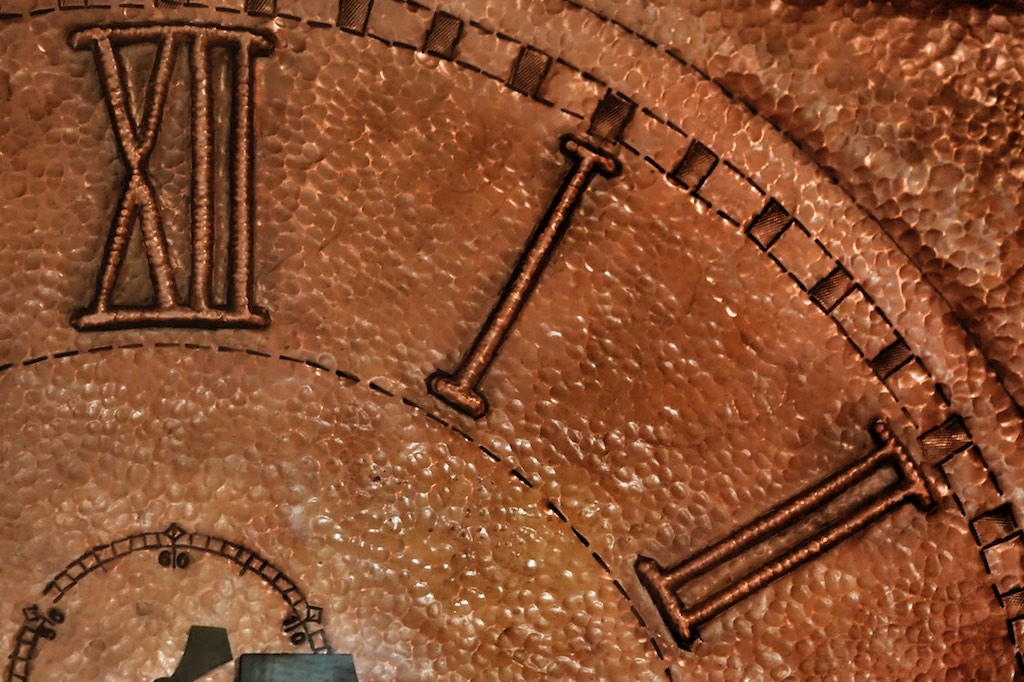
Stickley hammered brass Asheville clock face.
Stickley’s trademark is a joiner’s compass with the Flemish phrase Als Ik Kan written inside it, which translates to the best of my ability, and as you will read during the rest of this article, Als Ik Kan also applies to the Woody SPU Tonearm™ from Pete Riggle Audio Engineering.
French polish Woody SPU armwand.
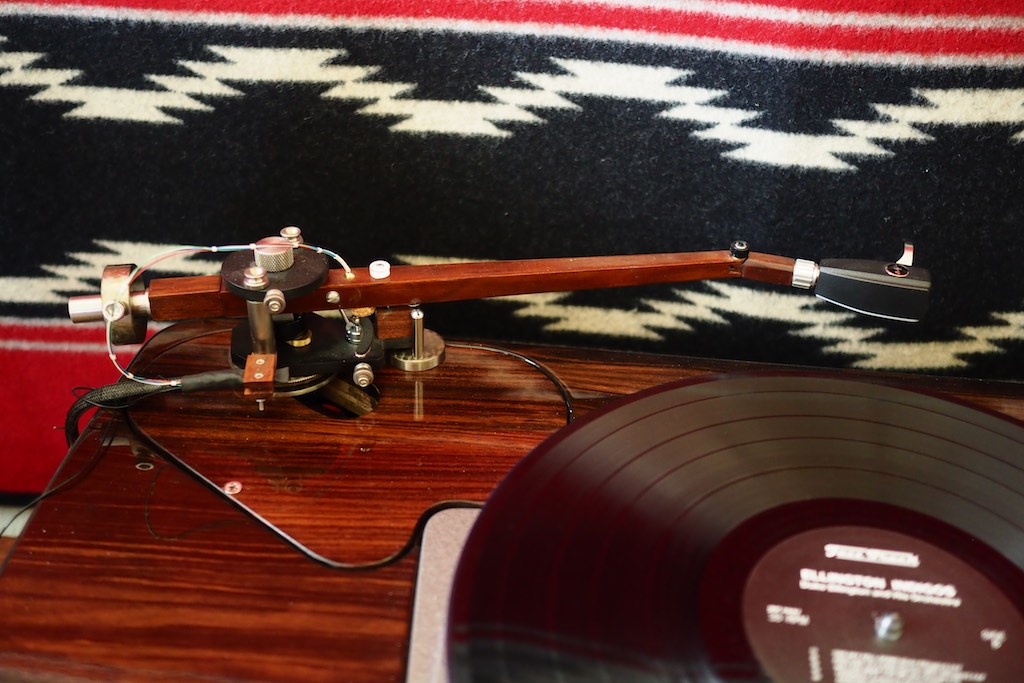
Each Woody SPU Tonearm™ is hand-crafted by Pete Riggle in what is essentially a labor of love, from the hand-rubbed French polish finish over an aged Spanish cedar wood tonearm wand, to the lacquered brass finish of the brass parts (or optionally, a ‘Smokey Silver’ finish).
Woody SPU with hammered metal patina on the counterweight.
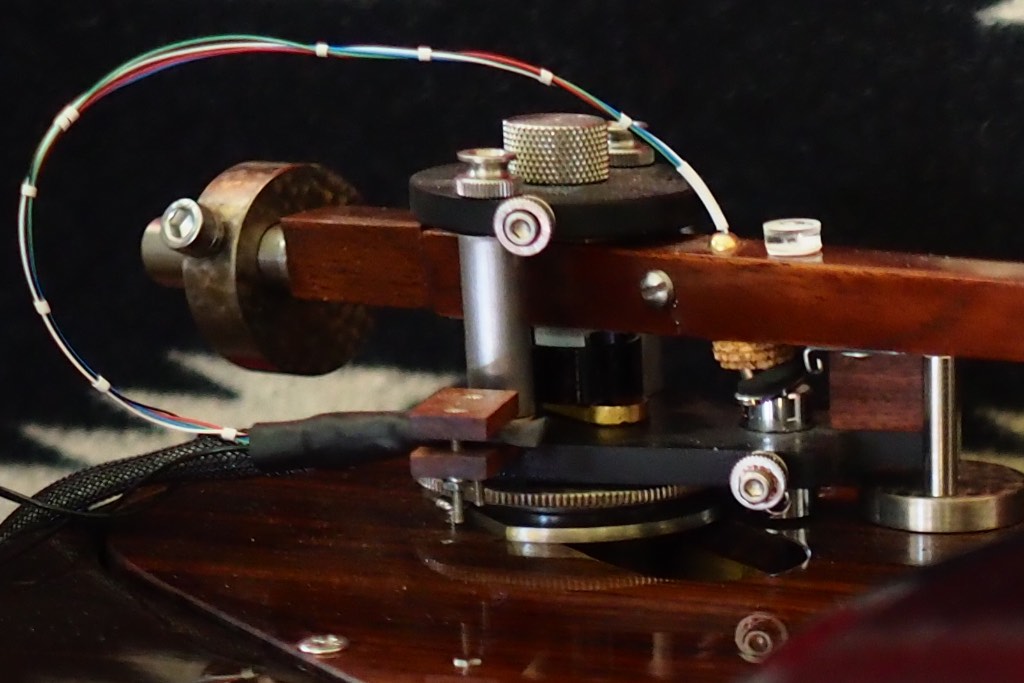
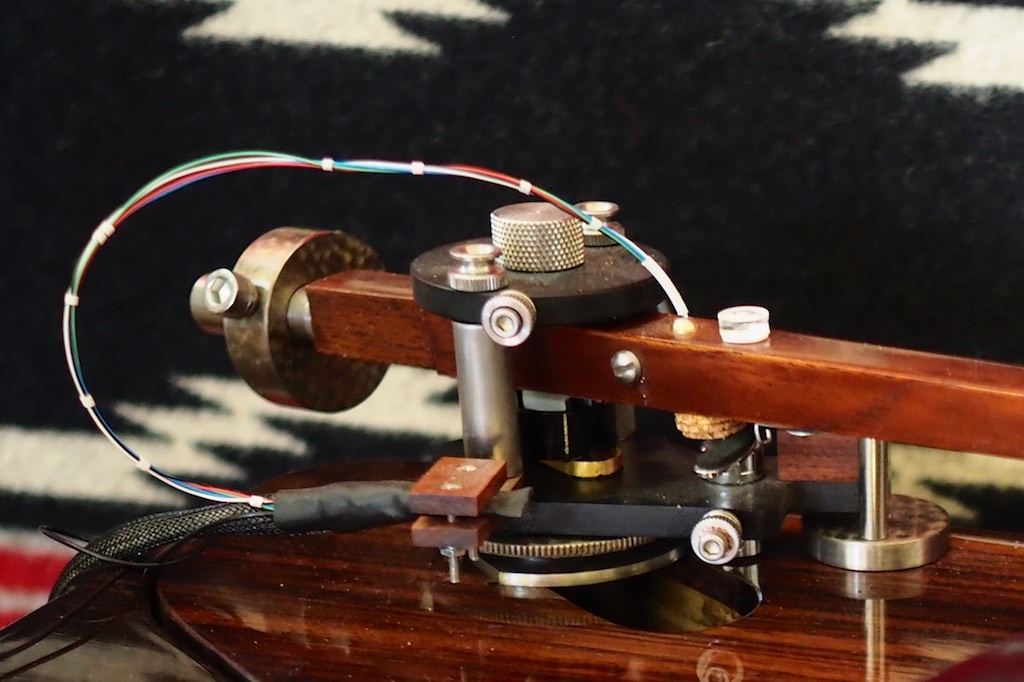
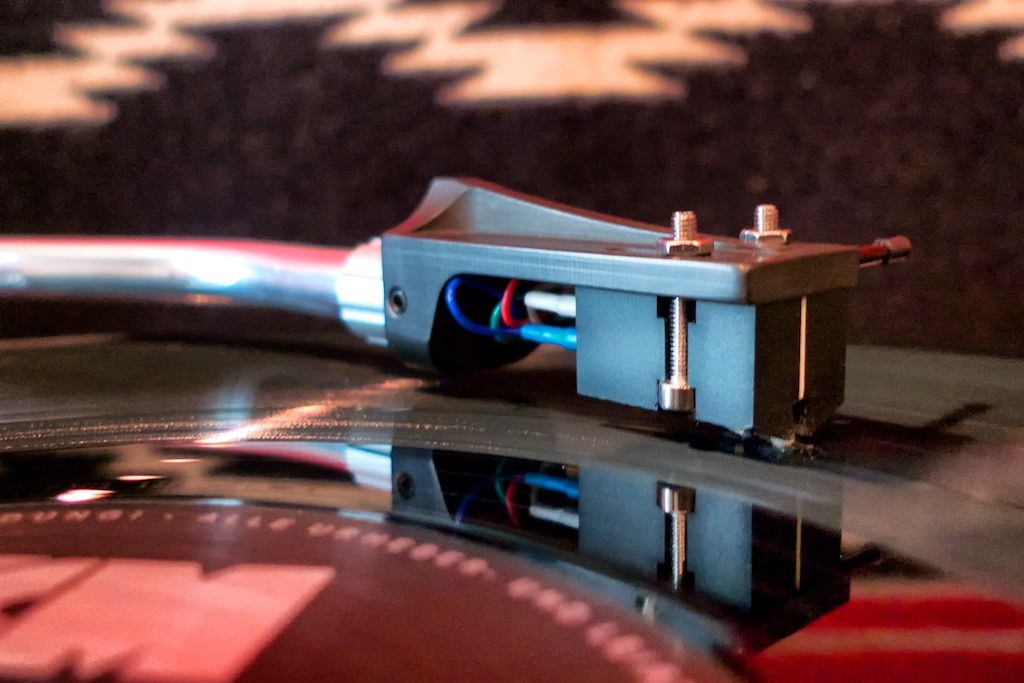
The Woody SPU Tonearm™ has quite a number of interesting features, like those that allow for adjustability while playing a record; including adjustment of the vertical tracking angle (the relative angle of the stylus to the record groove), adjustment of the azimuth (the left or right tilt of the cartridge body), and adjustment of the anti-skate bias (the tonearm force that pulls the cartridge towards the center of the record); or those design features like the string unipivot bearing system, an integral snubber, the ability to use oil damping if desired, the sliding arm-mounting plate that allows sufficient range of adjustment for correct overhang with either an A or G-style SPU cartridge, and a unique articulated joint inspired by the Garrard Model TPA-10 12-inch transcription tonearm.
I’d like to share a little story with you, about the time that Rafe Arnott and his buddy Don Parkhurst did a road trip from beautiful British Columbia to my place in Washington State for a listening adventure.
The idea was for Rafe & Don to hear my big Tannoy Westminster Royal Special Edition loudspeakers, with their very special Duelund CAST external crossovers, so they could write a ‘road trip’ article about their adventure for Part Time Audiophile, which you can read here.
Rafe getting an action shot of the Woody SPU tonearm.
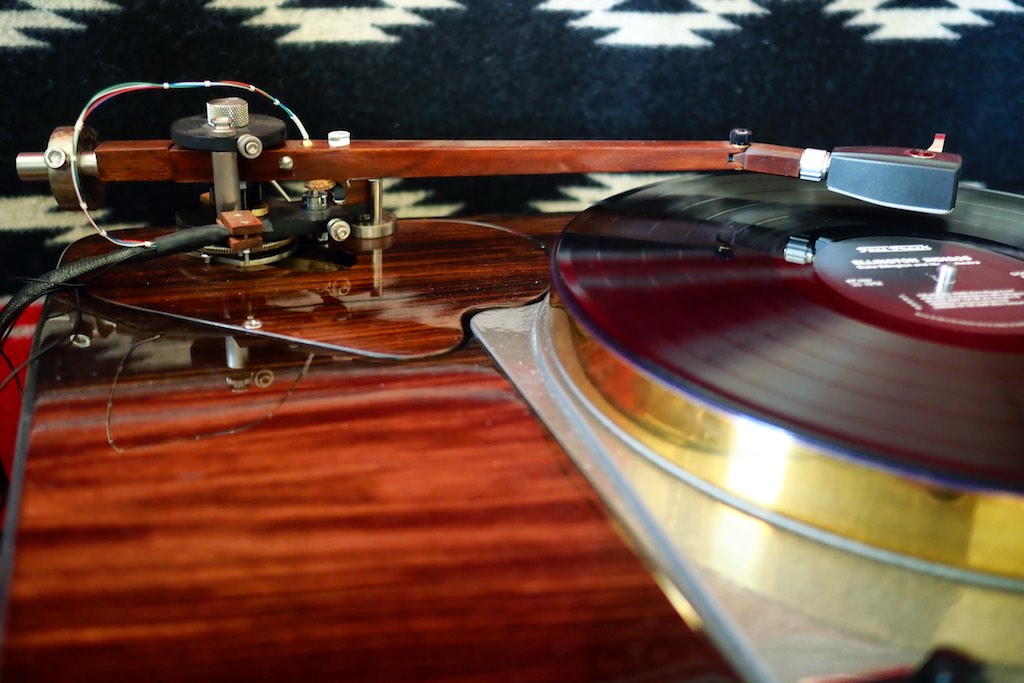
At the time of Rafe & Don’s visit I had been experimenting with A-B’ing my Thomas Schick tonearms, and the Woody SPU Tonearm™ from Pete Riggle Audio Engineering, on my Garrard Project 2015 turntable that I wrote about for you back in Issue 79.
Audio pals Leo, Ron, and Pete were all in attendance for Rafe & Don’s visit, and we were having a grand time listening to music, talking about audio, and enjoying some really nice regional wines & craft beers, while we did a musical time-travel journey through the recording arts, starting with early mono recordings, and then working our way through time to the ‘modern’ stereo era.
I had been playing my Schick 12-inch tonearm fitted with an Ortofon SPU Classic GM MKII stereo cartridge for my visitors, and the results were superb.
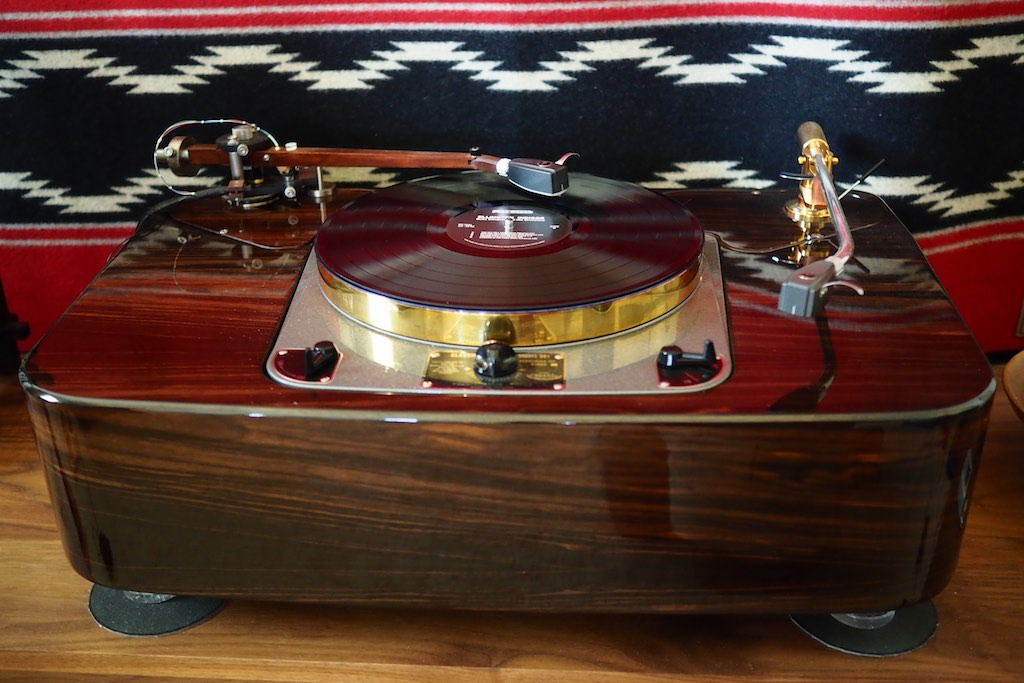
Woody SPU tonearm & Schick tonearm on the GP2015, front view.
During our listening session I swapped out one of my Schick tonearms for the 12-inch Woody SPU Tonearm™ so the group could do a little impromptu ‘audio reviewing’ session, and so I could hear their impressions about the differences they heard between these two tonearms, to augment my own.
After getting everything swapped, adjusted, and ready to play music, I queued up the record we had just listened to, and then played it using the Woody SPU Tonearm™ mounted with my Ortofon SPU Classic GM MKII stereo cartridge.
I figured it would be one of those “the Schick sounds like this,” “the Woody SPU Tonearm™ sounds like that,” “I like this one better, no, I like that one better,” sort of comparison, where we could all weigh in and discuss the relative musical & sonic merits we heard from these two very different approaches to tonearm design.
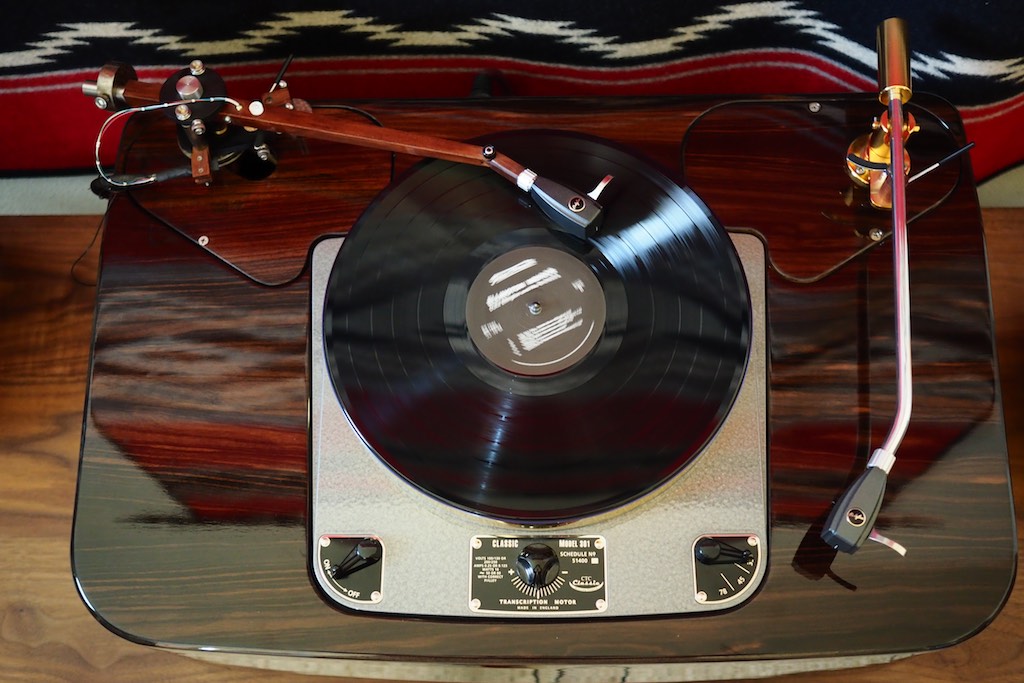
Woody SPU tonearm & Schick tonearm on the GP2015, top view.
When the stylus of my Ortofon SPU Classic GM MKII stereo cartridge touched down in the groove and began to play music the result was dramatic, with the Woody SPU Tonearm™ slapping down my Schick tonearm so severely that everyone in the room was shocked.
The noisy room full of happy chatting music lovers went dead quiet as we listened to the result of the dramatic transformation brought about by the Woody SPU Tonearm™ on my Garrard Project 2015 turntable.
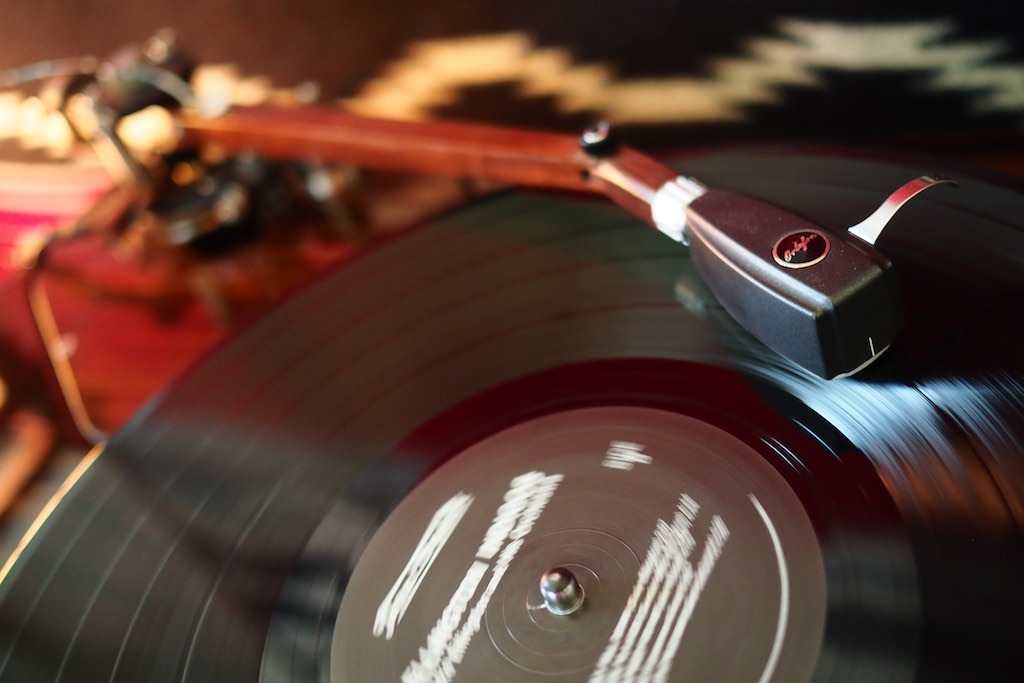
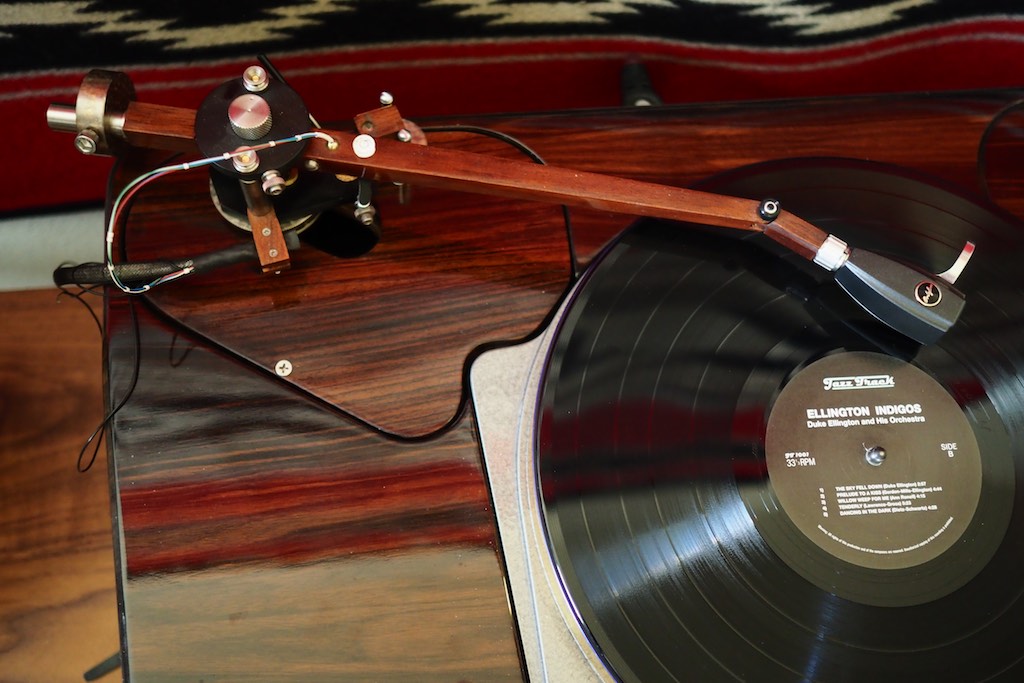
Woody SPU tonearm with Ortofon Classic SPU.
The Woody SPU Tonearm™ sounded ridiculously good compared to my highly regarded Schick tonearms, it wasn’t even close!
In comparison to the Schick, the Woody SPU Tonearm™ had much more room-filling presence, with a much greater sense of space, and a rich, natural, organic, and liquid presentation that was very easy to enjoy, and it portrayed female vocals more realistically & naturally. The Woody SPU Tonearm™ was also more convincing from a timbral and tone color perspective, having much more of a ‘real sound’ presentation of timbral textures and tone color distinctions.
Pete Riggle Audio Engineering
Pete is an engineer with a passion for music, and he has worked in the high-tech world of government engineering projects all his life. Engineer by day and music lover by night, Pete pursued enthusiast audio in parallel with his professional engineering career, and over time has built just about every type of audio component you can imagine from scratch, just for the fun of it.

Pete Riggle visiting Jeff's Place.
These days Pete is retired and focuses his energy on family, friends, and his passion for audio.
Pete hangs a shingle out in the audio realm in the form of Pete Riggle Audio Engineering, where he offers his popular Vertical Tracking Angle on the Fly (VTAF) device for a variety of tonearms (I happen to know that Ortofon recommends it to their customers with Rega arms), several models of his Woody tonearms, hand-selected ‘by ear’ crossover capacitors, as well as other audio goodies.
Pete’s collection of classic & custom loudspeakers that he keeps in his ‘Garden of Earthly Delights’ listening room all play music extremely well and sound extraordinarily good.
Recently I had the opportunity to hear Pete’s Altec A7 Voice of the Theatre loudspeakers with the custom crossovers he built, which are based on the Hiraga A5 crossover design, but with clever mods, and tasteful choices of components, to optimize them for the Altec A7.
I was shocked at how good Pete’s Altec A7’s played music and sounded. They sounded so good that I asked Pete to advise me on my own crossovers for my vintage Altec A5 & A7 loudspeaker projects, that I will be telling you all about in upcoming articles here at Positive Feedback.
I asked Pete if he would share a bit of his musical & audio journey with us, and here’s what he told me:
“In the early nineteen-forties we had a big Philco console radio in the living room of my grandparent’s home, into which I was born. The radio belonged to my mother. It had vacuum tubes and a big round paper coned speaker. We liked to listen to KGO in San Francisco, and stations in Denver and Spokane, which we could get at night. Radio was a big deal then. My sister and I would sneak out of bed and sit out of sight on a landing at the top of the stairs listening to Amos and Andy, The Shadow, Mr. and Mrs. North, and The Life of Riley.”
“In the fall of 1957 my young wife and I bought a small Magnavox record player with four Danish Modern legs and a medium-sized lightly built outboard speaker enclosure with a 12-inch permanent magnet speaker. The record changer was a Collaro. It was my second year of engineering school.”
“I was beginning to understand the physics of sound reproduction, and mail order catalogs full of audio components occupied my attention. In those days the more frugal audiophiles bought separate loudspeaker drivers and built their own speaker cabinets. My first DIY project was adding an inexpensive paper coned tweeter, with an L-pad, to the speaker in the Magnavox enclosure. I thought it sounded better. Those catalogs full of speaker parts, resistors, wire, capacitors, and chokes carried with them an inescapable mystique, which remains vivid to me to this day.”
“In the very early nineteen sixties my days were spent in engineering classes at the University of Washington. Evenings were spent on second shift as an engineering aid at the Boeing wind tunnel complex testing the aerodynamic characteristics of models of the Minuteman missile, the Boeing supersonic transport (never built), and Boeing’s version of the F111 aircraft.”
“During this period of university days and wind tunnel nights, an Eico HF81 push-pull stereo integrated amplifier kit came on the scene. The amplifier used the ubiquitous 12AX7 and EL84/6BQ5 tubes. It had a volume control, tone controls, a balance control, a phono stage, and a selector switch. Even today I insist upon a balance control of one sort or another. The Eico HF81 is now considered a treasure. I sold mine in the early sixties. Rats. In those days second shift at the wind tunnel was 4:00 pm until 12:30 am, and for quite a few nights between the hours of 1:00 am and 2:00 am were spent building that amplifier kit.”

University of Washington.
“In the early sixties there was a guy in Seattle selling an unbranded 8-inch Japanese full range paper coned driver along with plans for a sealed enclosure. He called it the Black Box. Somehow the panels for these speaker boxes got cut out, assembled, and received a flat black finish, along with orange burlap grill cloths. I know, as I was the one who did it for him. It was a long time ago. There was something like a million screws for the removable back panel of each speaker. It was a death march to remove and reinstall the back panels. This was before we figured out that we could drive screws with a drill-motor. My turntable/tonearm combo at the time was a Bogen B61 (a rebranded Lenco), with idler drive. The cartridge might have been a Shure, but it is past remembrance.”
“In 1962, within months of receiving an engineering degree from the University of Washington, I purchased driver components for a stereo pair of University Classic Mark II loudspeakers. These had a very impressively constructed (think Altec) 15-inch woofer, a nicely constructed 8-inch midrange driver, and a linen reinforced phenolic dome tweeter. The crossover points were 300 and something like 3000 Hz. I assembled these into a very heavy home-built version of the prescribed cabinets, with home-built crossover networks, using DIY hand wound chokes.”
“By the mid-sixties I was building a second order three-way electronic crossover with selectable crossover points. This was a discrete transistor device. The construction article and schematic were provided by G.C. McProud of Audio magazine.”
“Around 1978 I developed 4-way, five cubic foot, sealed column loudspeaker product. It was inefficient, but was theoretically 3 dB down at 20 Hz. For research purposes I developed a four-way electronic crossover, using op-amps, and added a Hafler DH200 stereo transistor power amp to the three Dynaco Stereo 120 amps. The crossover had selectable crossover points, allowing speakers to be sorted through to find the best drivers for each of the frequency ranges. I began manufacturing these 100-pound loudspeakers and found myself losing money on every pair. It didn’t help trying to make it up in volume. Even at that time there were at least 400 easily identifiable companies manufacturing loudspeakers. This was a great learning experience. My company name at that point was Riggle Acoustics. Following the advice of a wise uncle I shut the company down out of common sense. My disappointment was such that I took up fly-fishing instead of manufacturing loudspeakers, and which remains a wonderful diversion to this day.”
“I attended the 2001 & 2003 Vacuum State of the Art Conferences (VSAC) brought to us by Dan Schmalle (aka Doc Bottlehead), and was enthralled by the peoples’ audio on display, which reinvigorated my interest in home audio.”
“My response was to build a large shop building (36 x 50 feet) on our property for audio adventures, one third of which has become a listening room, which I refer to as the ‘Garden of Earthly Delights’.”
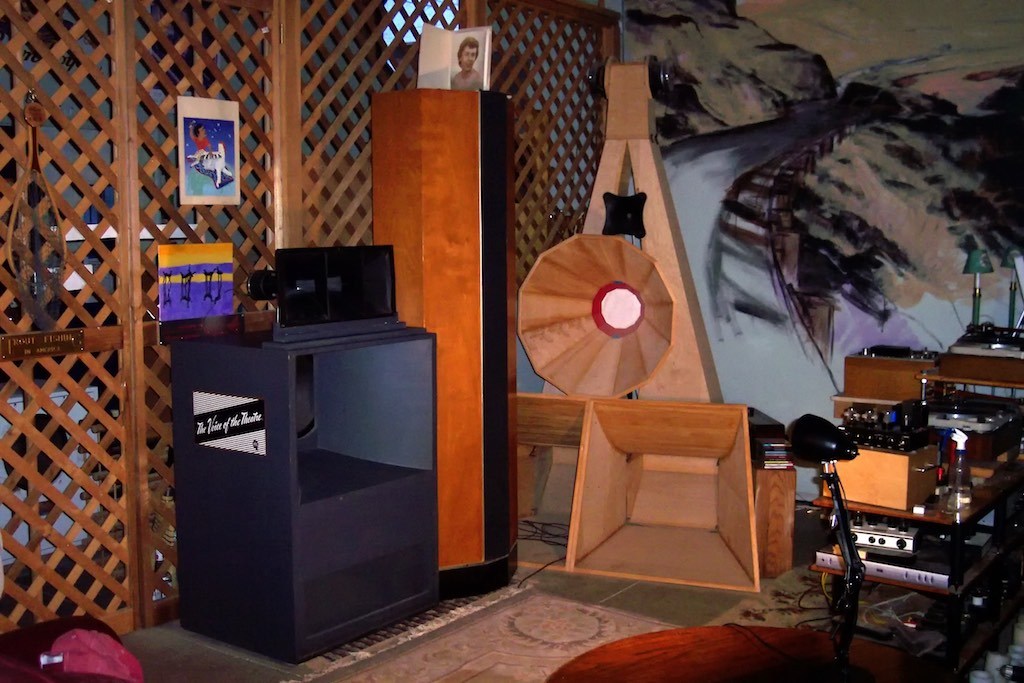
Pete's 'Garden of Earthly Delights'.
“In the loft of the listening room I built in a 29-foot long exponential horn designed with a flare frequency of 15 Hz. This horn plays 3 dB down at 20 Hz. The mouth is 9.5 feet wide by 6 feet high. I designed this horn with advice from the intrepid Steve Schell (see the Lansing Heritage web site). I made cutting diagrams for all of the panels, and built a scale model from the cutting diagrams. The miracle of this horn is that a growing group of friends gathered with me for what might be called a ‘horn raising’ party. We started cutting wood at 10 a.m., broke for lunch at 2 p.m., and had the horn assembled and playing before dinner by 8 p.m. The next day I crawled inside the horn looking for daylight at the joints, ran a little caulk, added a little external bracing, and now have been playing the horn for about 10 years. It works well with any pair of loudspeakers one harnesses it with. Surprisingly, it always seems to work best played up to a cut-off frequency of 160 Hz. Go figure.”
“Around 2003 I was re-introducing myself to vinyl playback. After a dozen year hiatus, it was frightening to mount a cartridge or cue up a record. I got over that in a hurry. The turntable was a Thorens TD125 with a Rega RB250 tonearm rewired by Origin Live, and with an Origin Live counterweight. It was a relief to get back to the sonic pleasures of analog. I wanted to explore the effects of VTA (more specifically the related stylus rake angle), and as anyone who has tried to set VTA with this type of setup will tell you, it is a nightmare.”
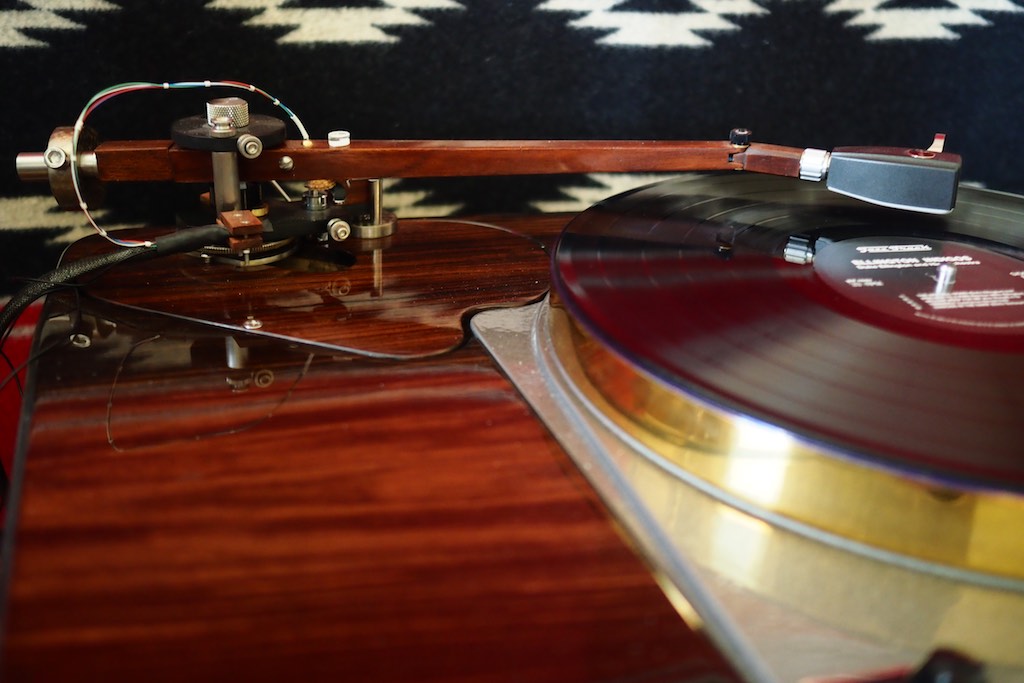
You can see the VTAF dial wheel at the bottom of the base of the Woody SPU tonearm.
“I spent over a year unsuccessfully looking for an after-market device that would easily allow the user to adjust VTA. I just couldn’t find one. So I got busy designing one for myself, specifically for Rega post mounted arms. I developed a device I call the VTAF, pronounced “vee-taff,” which stands for Vertical Tracking Angle On The Fly.”
“My life changed when I did the first needle drop with the VTAF. Within a note or two my chin dropped. I could hardly believe my ears. Even before experimenting with VTA the sound was dramatically more musical, with improved sound stage, imaging, inner detail, air, nuance, dynamics, and bass tonality, and with no clinical effect. At that point I realized that I was obliged to bring the VTAF to market. I patented the device and began production. A simple market analysis suggested that there were so many Rega arms on the market that one could stay busy just making VTAF units for Rega arms. That turned out to be overly optimistic. But many people inquired about fitting the VTAF to other brands and models of tonearms. With every inquiry I did the work and added an arm to the list of arms that can be improved by the VTAF. Now there is a VTAF for almost any tonearm. The VTAF has received hundreds of strongly favorable customer testimonials.”
“The VTAF is unique in that the tonearm floats under the influence of gravity in a bronze bushing fit into the armboard mounting hole. The bushing accurately positions the tonearm with very little error, but does not tie the tonearm-bearing pedestal down. This floating connection absorbs vibrations, preventing tonearm vibrations from entering the armboard, resonating in the armboard, and returning back down the arm wand as delayed and distorted signals that would blur the sound.”
Counterweight for the Common Man.
“Along the way I added the Counterweight for the Common Man (CCM) to my stable of products. The CCM is a high performance and cost effective replacement for Rega counterweight systems, and improves any Rega tonearm.”
“For years I was fascinated with tonearms and interested in the possibility of manufacturing them; however, the technology was a little intimidating. But one gets older and wiser, has a bigger bag of skills, and the Internet helps.”
“Using the very successful VTAF as a mounting system, I engineered and developed a tonearm system using a wood wand, a novel close-coupled string bearing, and oil damping. The idea was to use wood & brass wherever practical. I substituted Delrin (tm), a machinable plastic, in places where wood was impractical. I call this product the Woody (tm).”
“While developing the Woody Universal Tonearm™ I had in mind a system that could be manufactured in a small shop under the watchful eye of a single artisan craftsman (me) using materials with desirable acoustic properties.”
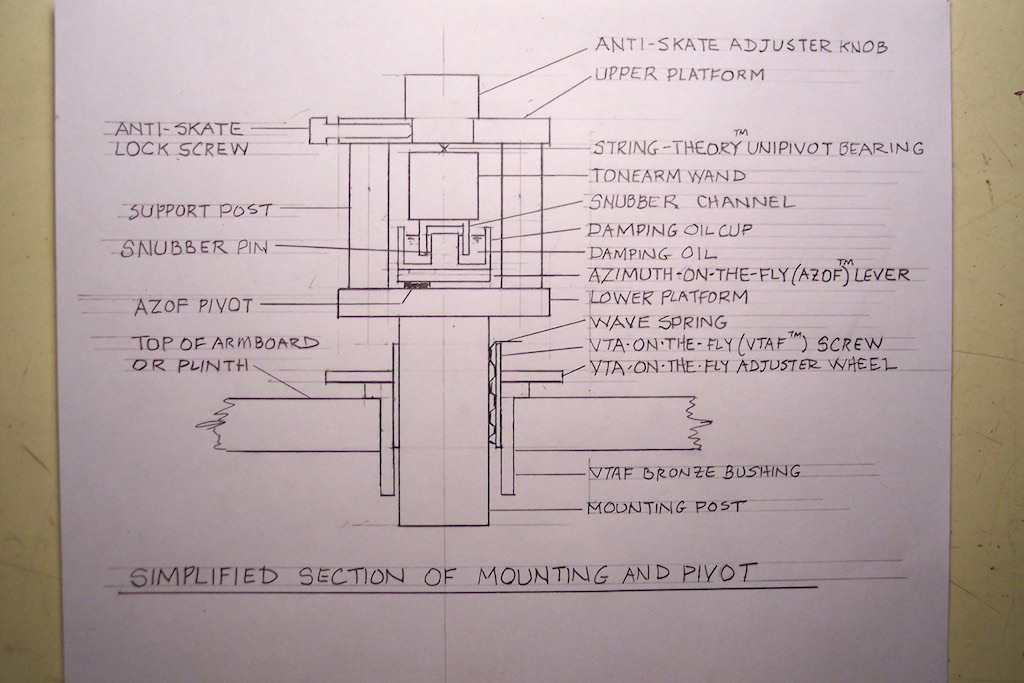
Woody cross section diagram.
“I kept a long list of the features that I wanted in a tonearm, with the result being the Woody Universal Tonearm™”
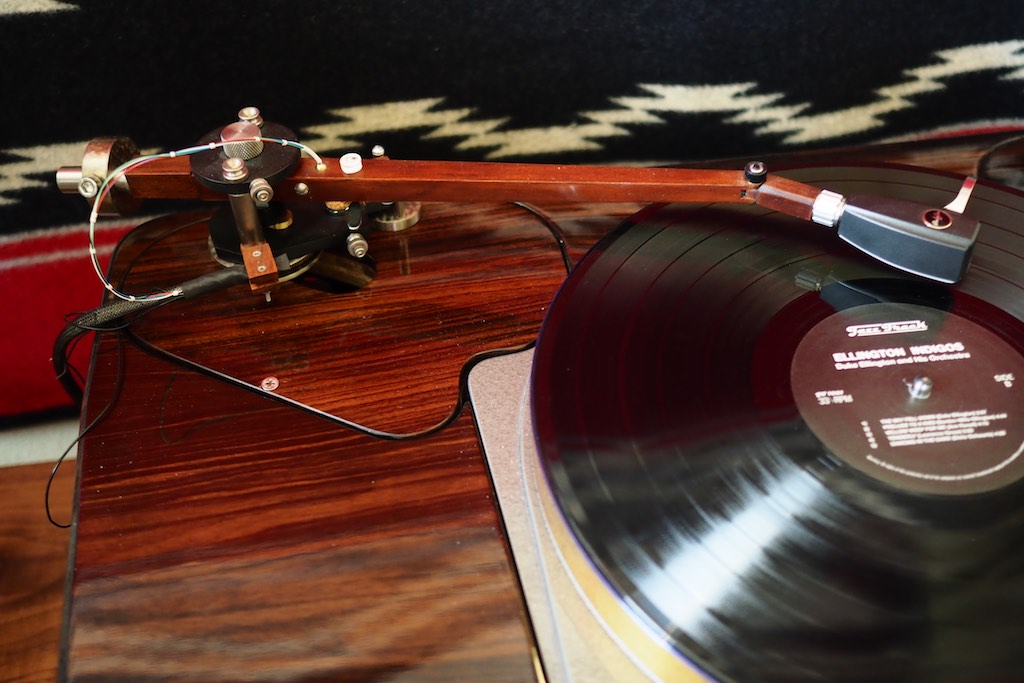
The subject of this article, the Woody SPU Tonearm™ - $2000 USD
In this article I want to focus on Pete’s Woody SPU Tonearm™, his latest, and I think his greatest achievement to date.
Woody SPU Tonearm by Pete Riggle Audio Engineering.
Pete had earlier volunteered to let me give his Woody Universal Tonearm™ a listen on my Garrard Project 2015 player system, but I had declined as I had been so focused on my Ortofon SPU phono cartridges, and the Woody Universal tonearm was not compatible with the SPU-style of cartridges (or the SME style of headshells). The Woody Universal also required a significantly different style of mounting to the armboard than my Schick tonearms, and I didn’t want to alter the expensive custom Artisan Fidelity armboards that matched Artisan Fidelity plinth.
A bit of time went by, then Pete came by for a visit one afternoon, and he was quite taken with the performance of my Ortofon SPU Mono CG 25 Di MkII phono cartridge mounted on my Schick tonearm, while we were listening to the Masterpiece’s by Ellington mono LP that I had playing.
Pete’s intrigue with SPU’s performance led him home to his workshop, where he began to consider how he might modify his Woody Universal Tonearm™ design so that it would be compatible with both SPU cartridges and the SME style of headshells.
As Pete told me, “The problem, though, was the question of how to make the bend of the tonearm wand required by the SPU cartridges with their integrated headshell, and the SME type headshell electrical connection. With aluminum arm wands this is usually done with a bend of the arm wand tube, but that’s not possible with a wood arm wand. My prayer was answered when I found an image of a vintage Garrard tonearm, the Model TPA 10, 12-inch Transcription Tonearm. This Garrard arm included an articulated joint near the headshell. This Garrard arm also had a telescoping wand, to allow the user to adjust overhang. With these features, the Garrard arm could use an integrated headshell and still achieve alignment and adjust overhang.”
“I did some careful design work and found out that with the Woody Universal Tonearm™ it was possible to fit an articulated wood end joint long enough to accept a standard SME type universal headshell connector, with the attractive wood end-joint blending into the rectangular cross section of the wood arm wand, and to bore the end-joint to accept a brass tube which would then accept the standard SME type headshell connector, with a spring fit connection to allow the headshell to be rotated for azimuth adjustment.”
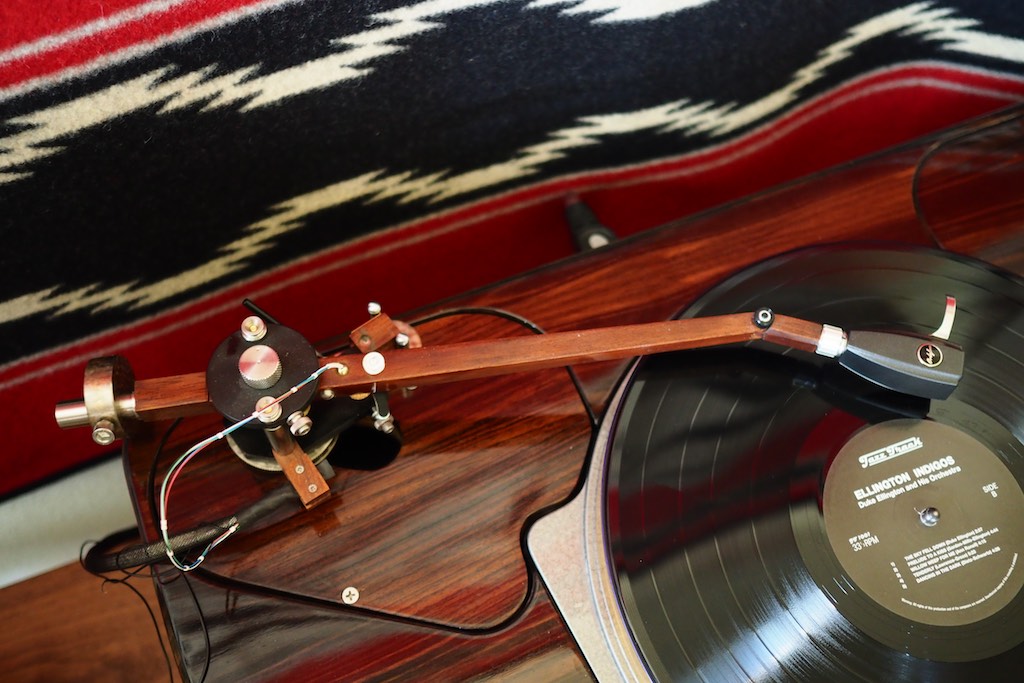
top view of the Woody SPU tonearm 'Garrard-style' articulated joint.
“Rather than attempt a telescoping arm wand to adjust overhang, as had been done with the Garrard TPA 10, it made more sense to use a sliding mounting plate, similar in concept to the SME sliding mounting plate, but much simpler to execute, and hidden from sight by the VTAF adjuster wheel. I already had the VTAF style of sliding mounting plate as a product.”
“The SME SPU tonearm has an effective length of 12.2 inches. Unlike arms by Ortofon, Thomas Schick, and many other similar bent and S shaped arms, The Woody SPU Tonearm™ has the sliding mounting plate to allow adjustment of overhang relative to the spindle to pivot distance, and has the articulated end joint to allow accurate alignment.”
“So the Woody SPU Tonearm™ allows correct overhang adjustment and correct alignment when using an Ortofon SPU cartridge. This doesn’t sound revolutionary at all, but arms like those by Ortofon and Thomas Schick have no provision whatever for alignment or for overhang adjustment.”
“Perhaps the combined use of a wood arm wand with string bearing, oil damping, VTA on the fly, Azimuth on the fly, and anti-skate on the fly, in conjunction with an Ortofon SPU cartridge is revolutionary in the Woody SPU Tonearm™.”
You can see the sliding mounting plate at the base of Woody SPU Tonearm, and the armboard slot that allows for adjustment.
“One more aspect of the Woody SPU Tonearm™ arm is that the sliding mounting plate provided with the arm allows sufficient adjustment that the user can use either the A or G style SPU cartridges with the same arm.”
Installation & Setup of the Woody SPU Tonearm™
When you first open the shipping box containing your new Woody SPU Tonearm™, you’ll want to take out the owner’s manual and read through the introductory sections to get the lay of the land, and then you’ll want to get busy familiarizing yourself with the shipping package’s contents for installation & setup.
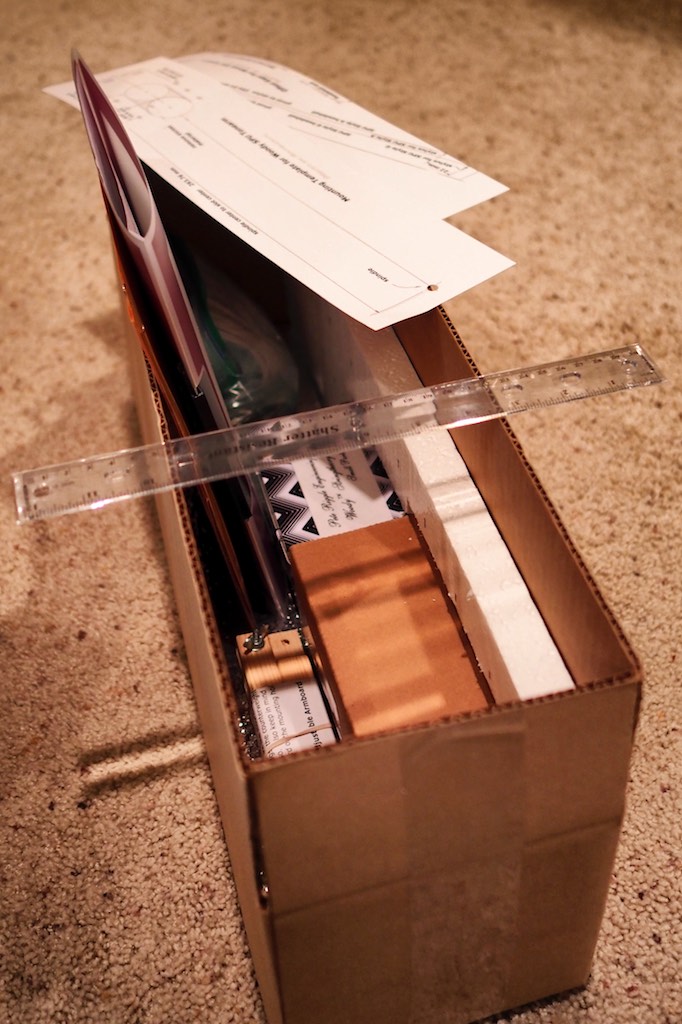
Woody SPU Tonearm shipping box.
Unlike most tonearm manuals, the Woody SPU Tonearm™ owner’s manual contains a wealth of information, reflecting Pete’s engineering background in its attention to detail, as well as lots of practical advice that should make it possible for anyone to follow the installation & setup instructions to successfully get a Woody SPU Tonearm™ up and running.
Woody SPU Tonearm.
The Woody SPU Tonearm™ is very adjustable, and that can be a little bit intimidating at first during the initial mounting & setup, but fortunately, Pete’s very detailed owner’s manual gives step-by-step instructions to get everything up and running in a straightforward fashion, and after that it’ll be clear sailing for getting the best out of your record collection.
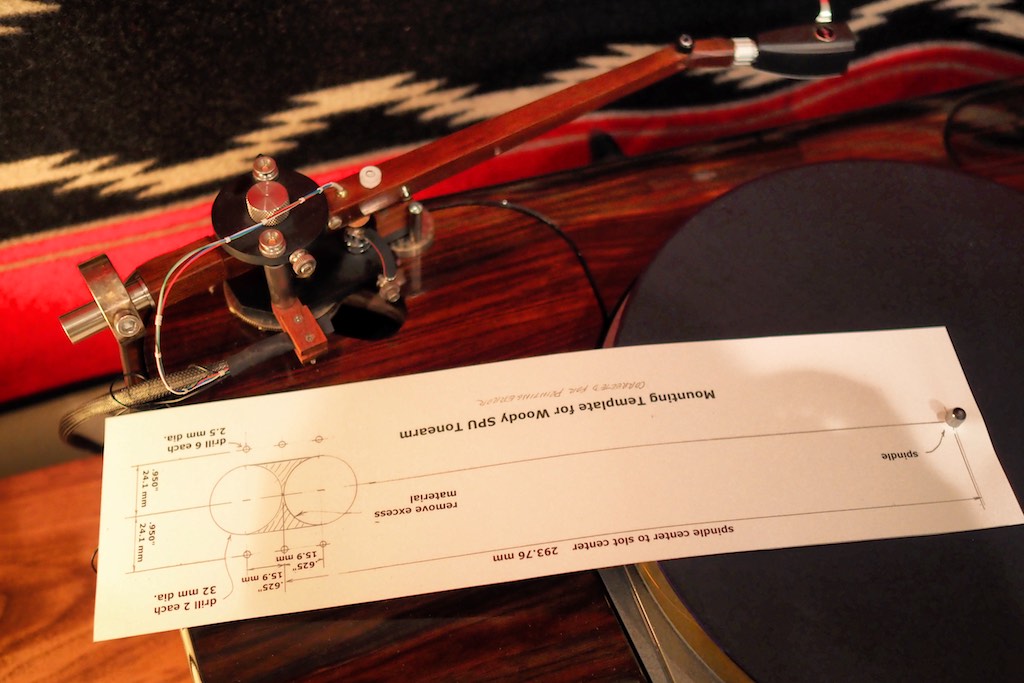
Woody SPU Tonearm mounting template.
You’ll need to prepare your armboard for installation of the sliding mounting plate & mounting bushing that the Woody SPU Tonearm™ inserts into, for which Pete provides a mounting template for the dimensions & orientation, as well as detailed instructions, so you can cut the armboard slot in just the right place for your turntable. You can see the mounting template sitting on my turntable next to the armboard as an example, in the photo above.
I can’t take credit for the beautiful armboard the Woody SPU Tonearm™ is mounted on in the accompanying photos. For this review, Pete created a beautifully hand-crafted armboard for me to mount the Woody SPU Tonearm™ on that was a drop-in & drop-dead gorgeous replacement for my custom Artisan Fidelity armboard. I am very impressed.

The armboard Pete made.
You can see the slot for the sliding mounting plate in the armboard photos, which makes adjustment of correct overhang relative to the spindle-to-pivot distance a breeze when experimenting with A or G style SPU phono cartridges. It’s really nice to have this adjustment, as with my Schick tonearms, for example, you have to have multiple tonearms in order to accommodate the differing length of the A or G style SPU cartridges. Being able to have one tonearm that can accommodate both A or G style SPU phono cartridges with a simple adjustment is both convenient and cost effective, and as a bonus, Pete provides an additional template to get both A or G style SPU phono cartridges setup perfectly.
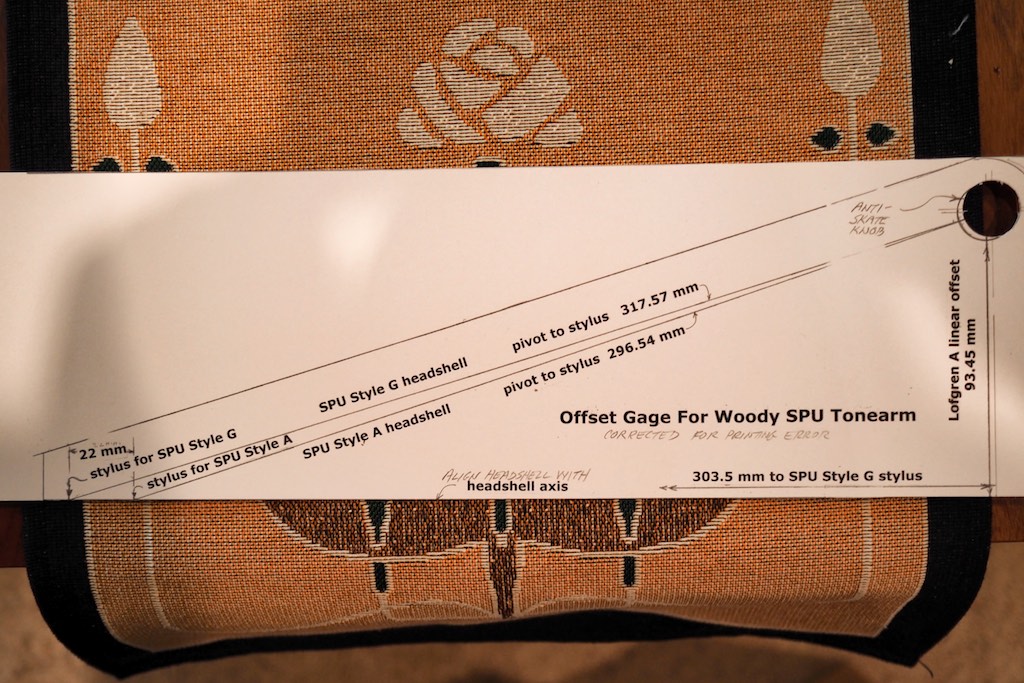
A or G style SPU template that comes with the Woody SPU Tonearm.
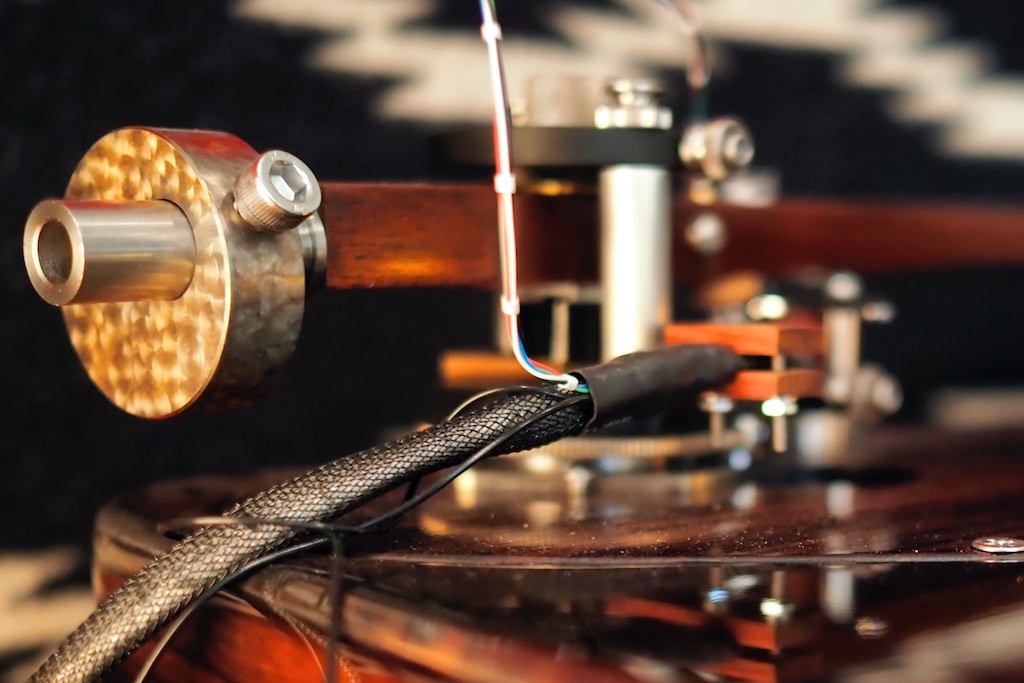
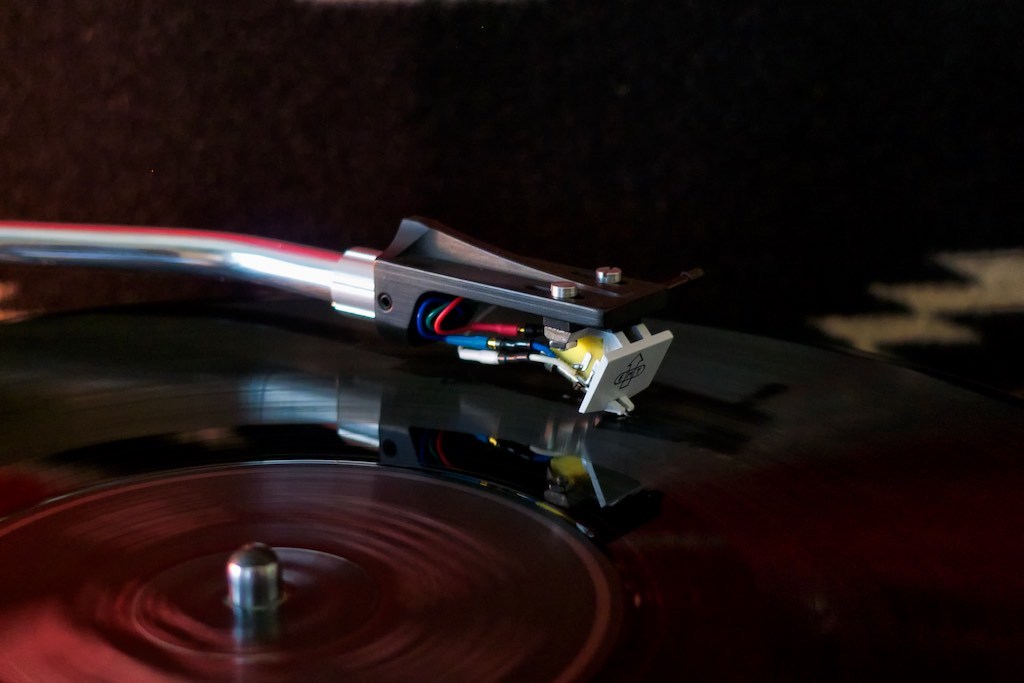
After the Woody SPU Tonearm™ is mounted to the armboard, the guide assembly is installed, then it’s time to mount your chosen phono cartridge to the armwand. One of the beautiful things about the standard SME type universal headshell connector that is used in the Woody SPU Tonearm™ armwand is that it makes it so easy to install either SPU phono cartridges, or a conventional cartridge mounted on a headshell, and swap them in and out as you see fit.
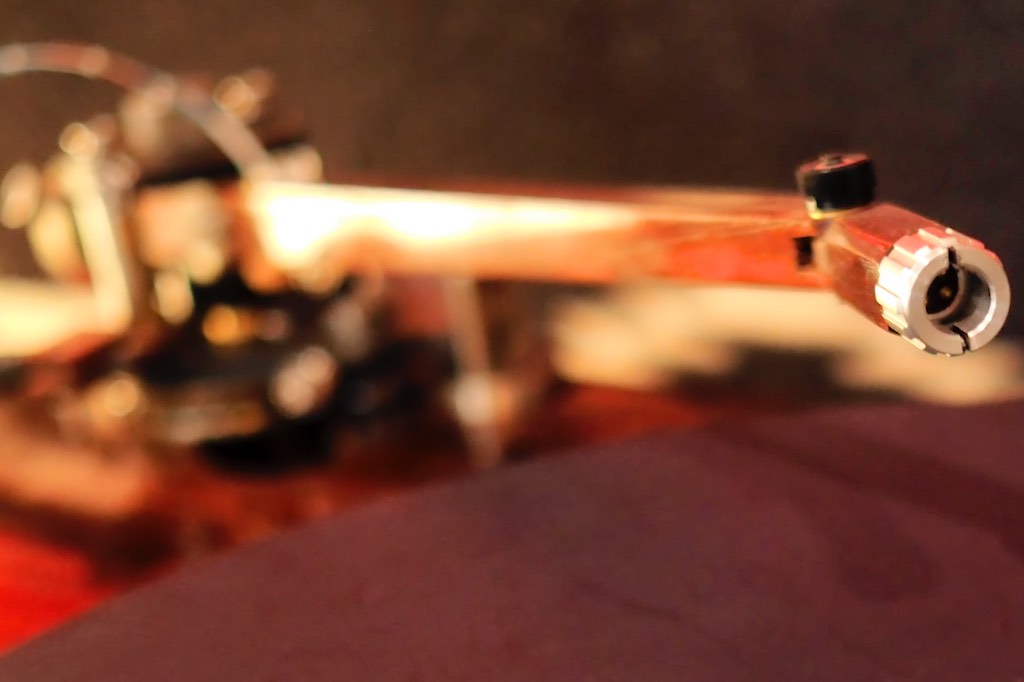
The SME type universal headshell connector on the Woody armwand.
I really like having two tonearms on my Garrard Project player system, with one tonearm setup for my Ortofon SPU Classic GM MkII stereo phono cartridge, and one tonearm setup for my Ortofon SPU CG 25 Di MkII mono cartridge.
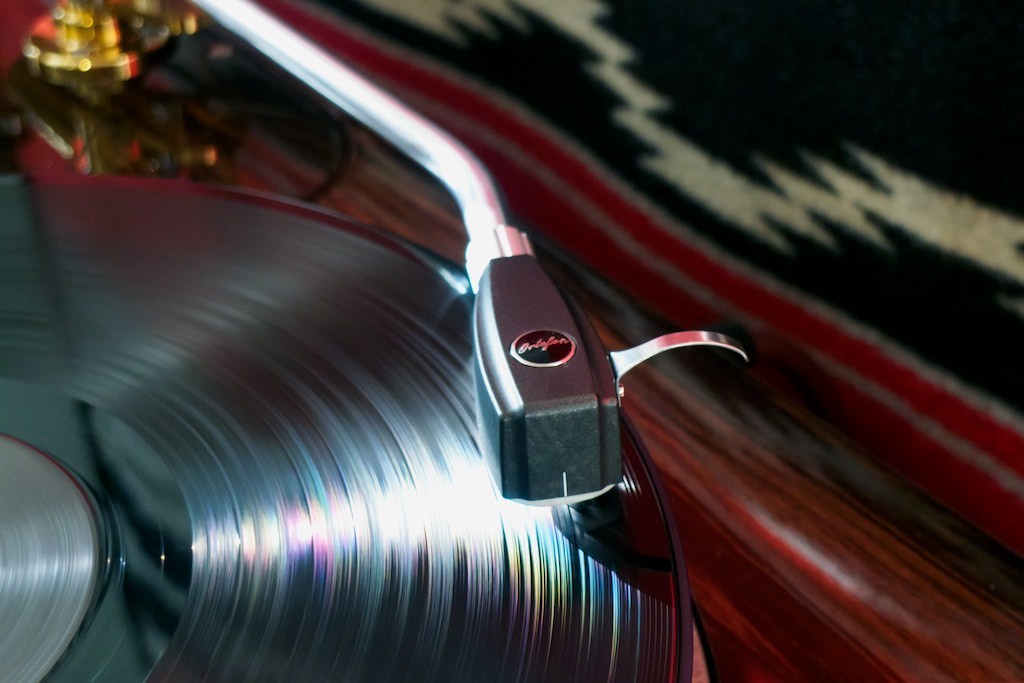
Ortofon SPU Classic GM MKII.
It is incredibly convenient to have two tonearms setup & optimized for the stereo & mono records I enjoy listening to so that I can swap what record I want to listen to on the fly without having to do any tonearm setup work.
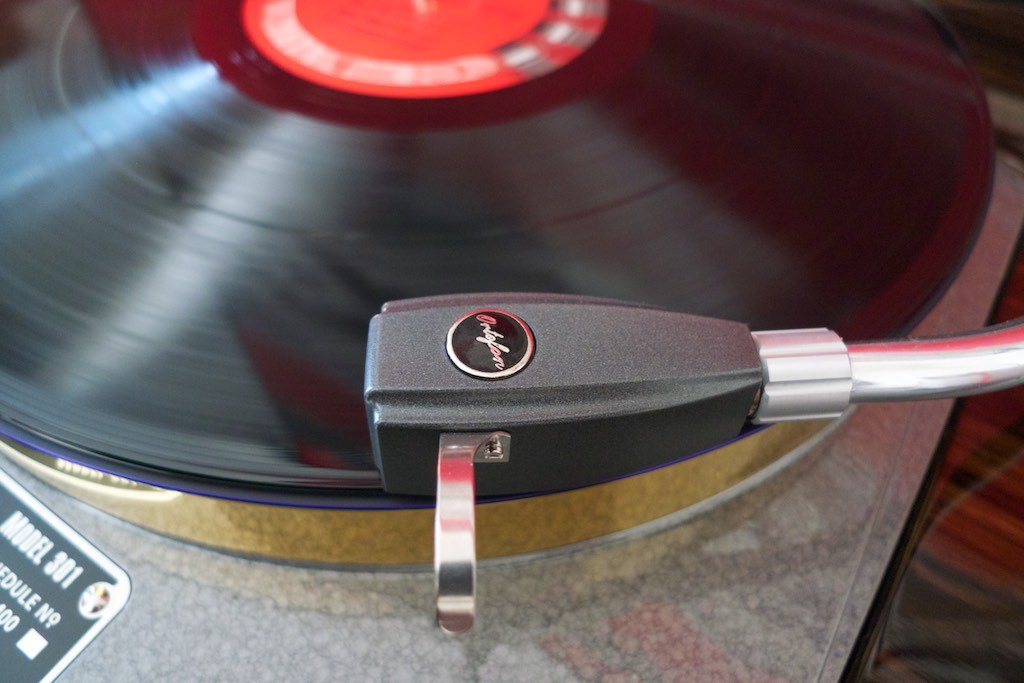
Ortofon SPU Mono CG 25 Di MKII.
I also variously enjoy using my Denon DL103 & EMT TSD-15N stereo phono cartridges, mounted on the impressive Thomas Schick headshell when duty calls, and from Yazaki-san’s inspiration, a vintage Shure V15 III with a VN35MR stylus mounted on a Yamamoto HS-1A African black wood headshell, fitted with Western Electric WE24GA headshell wires.
Denon DL-103 & Schick headshell.
EMT TSD-15 & Schick headshell.
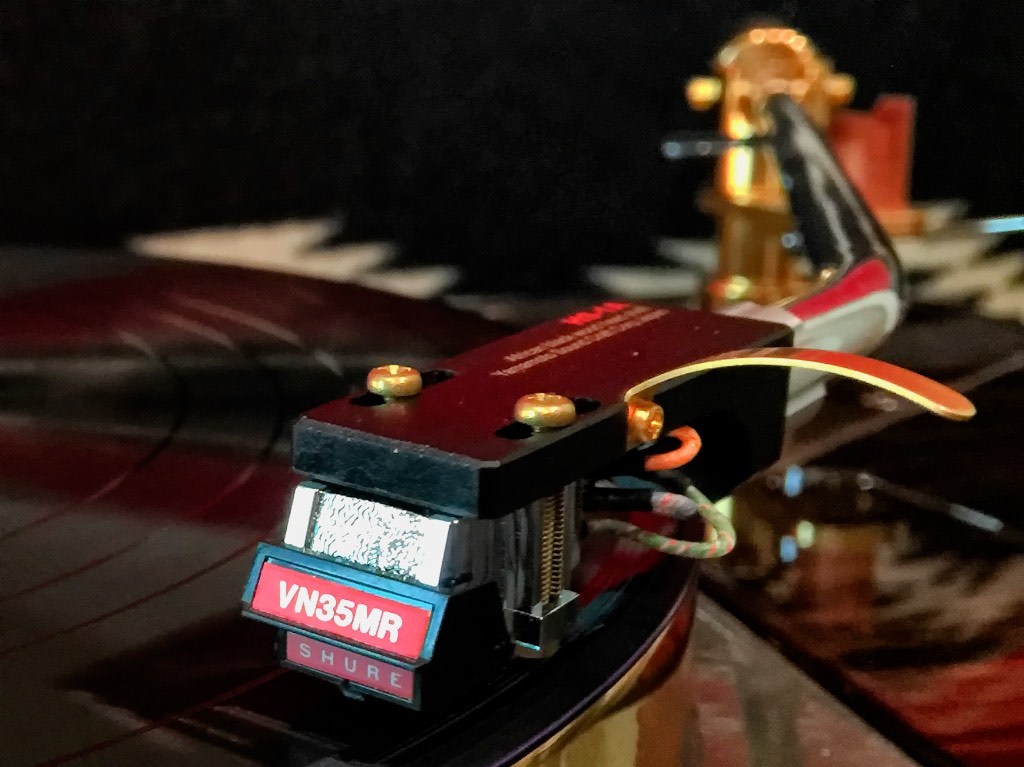
Vintage Shure V15 III with a NOS VN35MR stylus.
Each of those phono cartridges have their own special charms, and I wouldn’t want to be without any of them!
Once you pick out a phono cartridge to start your setup with, then you can go through the rest of Pete’s setup regimen of installing the appropriate counterweight for your cartridge’s mass, setting the tracking force, setting the overhang, dressing the wire harness compliance loop, doing a course adjustment of VTA, doing a course adjustment of azimuth, check cartridge alignment (if needed), adjust lateral balance, adjust anti-skate, adjust the lift/lower mechanism, fill the damping cup with the desired amount of damping oil, connect the Woody SPU Tonearm™ to your phono stage, and play a record!
Once you’re done setting up the feature-laden Woody SPU Tonearm™, you’re good-to-go until you want to mount a different phono cartridge. Mounting a different SPU phono cartridge, or a cartridge attached to a headshell, is an easy transition, a ‘plug & play’ experience with only the tracking force & azimuth (I use a mirror) needing adjustment between swaps. It’s a quick & a snap!
Living & Listening with the Woody SPU Tonearm™
Ok that's all for now on the sneak peek, I'll let you know when it goes live on Positive Feedback so you can read the rest of the article.
Enjoy, and thanks for stopping by!


